As much as you could have the best helmet on the market, it won’t do you any good if it doesn’t fit right. Therefore, before purchasing any helmet, one has to determine the size of one’s head by measuring it to avoid tiresome return policies and processes.
Measure Head for A Helmet
When deciding on the appropriate helmet for your task, one of the key factors to consider is fitting. If a helmet doesn’t fit correctly, it will not help in providing adequate protection during a crash or accident. That’s why measuring your head to fit an appropriate helmet will come into play. Measuring your head is an easy job, but it’s essential to ensure that you wear the proper helmet size. This is a complete instruction on measuring your head to get an appropriate size helmet:
1. Make Sure You Have the Right Tools
Before you begin to measure, make sure you have a comfortable measuring tape. If you don’t own a soft measuring tape, you could use a string length and test it against the ruler.
2. The Measuring Tape Should be Placed
The most significant portion of your head is usually close to your eyebrows and ears. Be sure your tape is level across your head to warrant a precise measurement.
3. Make the Measurement
The measuring tape should be wrapped around your head, ensuring it’s not overly snug. Note the measurements in inches or centimeters by the guidelines that the manufacturer of your helmet provides.
4. Check the Measurement
Have your head measurements, then refer to the measurement chart supplied by the maker. Different models and brands could be slightly different in size, so it’s essential to stick to the guidelines specific to the particular helmet you’re looking at.
5. Take a Look at Different Sizes
If you are between 2 sizes adequate to the measurements, it is recommended to test with both sizes to find the accurate fitting. Remember that an adequately fitted helmet must feel secure and snug and not cause discomfort or tension in places.
6. Think about Adjustable Systems
A few helmets have adjustable fitting systems, such as a dial-adjust mechanism or adjustable padding. These allow you to tailor your fit adequately to your head form.
How to Measure Head for A Helmet
Step #1: Determining The Circumference of Your Head
Determine the Shape of the Helmet
Shape plays a significant role in determining which profession or activity a helmet would be used.
Before considering the size of the helmet, you should check its shape to determine whether you need a cycling helmet or one for construction sites.
You cannot use a helmet meant for cyclists in an industrial or construction environment because it may not have been designed to withstand the hazards present in such environments.
There are usually three types of shapes involving helmets: long oval, intermediate oval, and round oval.
Long oval – The shape of the head tends to be longer front-to-back rather than side-to-side.
Intermediate oval – The helmet’s shape would be slightly longer from front to back compared to side-to-side. This also tends to be the most common shape.
Round, oval shape—The helmet’s shape is almost equal from side to side and front to back.
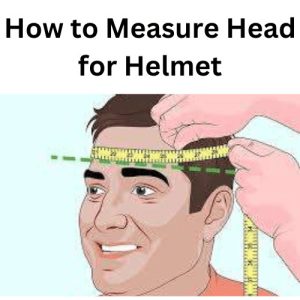
Measure the Circumference of Your Head Employing a Flexible Measuring Tape
Using a flexible measuring tape, wrap it around your head. You should position it above your eyebrows and ensure the tape lies flat against your head and doesn’t pinch at any corner. Generally, the tape should be considered level all around. Also, note that:
1. Measuring your head circumference could prove challenging, so you are advised to ask a family member or friend for help.
This would increase your chances of survival. Alternatively, you can use a mirror to level the tape better.
2. If you’re entirely on your own, cross the ends of the tape on the front of your head to make the readings much more comfortable.
Note the Measurement on the Tape
For accuracy reasons, you are advised to make several measurements and settle for the largest one.
After that, you must note this measurement down for future reference when choosing the right-sized helmet for your head.
Step #2: Trying the Helmet On
We also have a detailed review on how to size a motorcycle helmet if you’d like to check that out!
Determine the Type of Helmet Needed
The kind of helmet chosen solely depends on its purpose or the type of environment in which it will be used.
Manufacturers design each type of helmet to withstand specific types and forces of impact unique to that purpose or environment.
For example, you can’t use a baseball helmet as a hard hat on construction sites or vice versa.
At times, several types of helmets are designed for the same purpose or work environment, and it’s up to the user to figure out which one best suits them.
Choose the Helmet that Fits your Head Circumference
Most helmets in the market are designed to fit a wide range of head sizes or circumferences, as listed by the manufacturer in their packaging. You may notice size designation – small, medium, or even large – that correlates with a specific helmet sizing chart with all the head circumferences listed.

Try on the Helmet
Before purchasing the helmet, it would be helpful if you were in a position where you could try it out. This would help you ensure that it perfectly fits your head, covering both the forehead and back while still being comfortable.
To get the right fit, you should wear the helmet and shake your head front-to-back and side-to-side. If you notice that the helmet wobbles in either direction, then it isn’t the right size.
Similarly, if someone puts their hand on the helmet while you’re wearing it and twists it, your head should go toward it. If you notice the helmet turning freely on your head, it might be too loose for you.
However, other types of helmets with suspension points and straps hold your head in place, even if it may seem a bit bigger. These helmets, also known as hard hats, are designed to keep the wearer’s head in place without being loose.
Safety helmets come with intricate designs and features that provide extra safety measures for work environments such as construction sites and industrial areas. These jobs have a higher potential risk of hazards than others, as they all involve life-threatening accidents.
Step #3: Checking the Helmet Before Using
You need to check the helmet for a few weak points because, as much as it may fit perfectly, you cannot be 100% sure it’s fail-proof.
Adjust the Straps
If the helmet includes straps that hold your head in place, check whether they are in the proper condition. For example, if you’re dealing with chin straps, ensure they fit comfortably and don’t pinch.
Also, ensure they don’t restrict your ability to breathe, swallow, or speak comfortably. However, it shouldn’t be too loose simultaneously because this would enable the helmet to come off quickly.
Consider Additional Padding
Most helmets come with removable padding that helps keep you comfortable throughout their use.
However, you can consider getting extra padding as you wash the original one to keep it hygienic enough and clean if you don’t prefer disposal.
Inspect the Helmet before Use
This is one very essential step that you are advised never to ignore. As much as it might be a new helmet.
It can be faulty, so you are advised to check for any available weak spots. For the helmet to be effective, you must take the necessary steps to ensure it is in the proper working order.
1. Know the History of the Helmet
Know where the helmet was stored in inventory before it was sold, as adverse atmospheric conditions can weaken it.
2. Carry out Preliminary Observations
This includes checking the serial number and the CE mark to confirm that the helmet is an authentic safety device before buying it.
3. Inspect the Shell of the Helmet
Once you’ve familiarized yourself with the helmet, you should carefully inspect the shell to ensure there are no marks, deformations, impacts, cracks, bumps, wear, or signs of chemical products. If you notice any of these signs, then the helmet isn’t suitable for purchase.
It doesn’t matter whether the helmet is new because, during transportation or storage, it might have been subjected to poor conditions that could’ve led to the emergence of any of the above red flags.
4. Check on the Hardliner
Look for cracks, marks, or even missing parts in the hardliner. You are also advised to remove the comfort pads to get a better view of any potential damage.
5. Check on the Webbing
Check the helmet’s webbing while looking for significant signs of any wear, cuts, burns, or even deformations of various plastic pieces.
You cannot ignore the smallest details because, as minor as the warning signs may be, they can interfere with the helmet’s safety. Everybody knows how to measure the head of a helmet.
6. Inspect the Headbands as Well as Attachments
Check on the headbands and their attachments while looking out for red flags. You can again remove the comfort pad for better analysis.
7. Make Sure the Adjustment System functions appropriately
Ensure that the crank moves in both directions smoothly and that the safety device isn’t missing any parts.
8. Inspect the Foam
Ensure the foam is not worn out, dirty from dust, or missing chunks or flaking material.
9. Inspect the Additional Accessories
These include face shields, headlamp clips, ventilation parts, and suspension points. Ensure there aren’t any signs of wear or deformation on them before purchasing the helmet.
(FAQs)
Q: Why is it important to measure my head for a helmet?
A: It’s essential to measure your head for a helmet because a helmet that doesn’t fit properly won’t provide adequate protection in the event of an impact. A too-loose helmet can shift around during a crash, while a too-tight helmet can cause discomfort and headaches.
Q: How do I measure my head for a helmet?
A: To measure your head for a helmet, use a soft measuring tape to measure the circumference just above your eyebrows and ears. Make sure the tape is level and snug but not too tight. Record the measurement in centimeters or inches.
Q: What size helmet should I buy based on my head measurement?
A: Helmet sizes vary by brand and model, so it’s essential to consult the sizing chart provided by the manufacturer for the specific helmet you’re interested in purchasing. Generally, if your head measurement falls between two sizes, it’s best to go with the larger size and use the helmet’s adjustment features to fine-tune the fit.
Q: Can I measure my head using a string or shoelace instead of a soft measuring tape?
A: While using a string or shoelace to measure your head is possible, it’s not recommended as they can stretch and provide an inaccurate measurement. A soft measuring tape is the most accurate and reliable tool for measuring your head for a helmet.
Q: What if my head measurement falls between two helmet sizes?
A: If your head measurement falls between two helmet sizes, it’s best to go with the larger size and use the helmet’s adjustment features to fine-tune the fit. If the helmet feels too loose, you can use the padding or fit system to make it snugger. If it feels too tight, you may need to try a different brand or model of helmet that is better suited to your head shape.
Final Thoughts
Finally, before buying a helmet, you should always ensure that it meets all ANSI, OSHA, or other significant safety organization requirements.
You can never be too careful when looking for the perfect helmet to protect your head and life from various safety hazards.
Follow the above steps when curious about how to measure a helmet or a head to get the best results.
#HelmetCheck #HeadSize101 #FitYourHelmet #SafetyFirst #MeasureUp #HelmetGoals #HeadGameStrong #GetTheRightFit #ProtectYourNoggin #HelmetHacks
How to measure head, how to measure your head, how to, helmet, how to measure, how to measure your head for a helmet, how to measure your head for a bicycle helmet, how to measure your head for a scooter helmet, how to measure your head for a skateboard helmet, how to measure for helmet, how to measure for bike helmet, how to measure for a bike helmet, how to measure for a motorbike helmet, how to measure helmet size motorcycle, how to measure your head for cosplay, measure