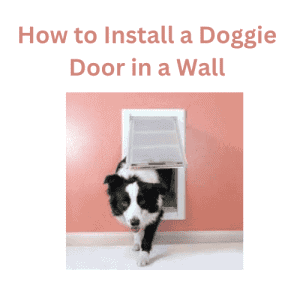
Follow these step-by-step guides to learn how to install a doggie door on a wall easily and quickly.
Install a pet door on a wall to give your dog a grand entrance. A pet door is valuable if you have pets at home since it allows them to come and go as they please.
If you are tired of repeatedly letting your cat or dog in and out, a pet door is a more efficient option.
A pet door, also known as a dog door or cat door, offers greater efficiency, allowing your pets to move in and out of your home freely.
Therefore, you should learn some essential tips for installing a dog door in a wall, so you can do it yourself at a relatively low cost.
The Ultimate Guide to Installing a Doggie Door in a Wall
Are you tired of playing doorman for your furry friend? A doggie door might be the best remedy for you and your animal. In this comprehensive guide, we’ll explain everything you need to know about setting up a doggie door in a wall.
You’ll gain insight into the benefits, the step-by-step installation process, and important pointers for seamless integration into your home.
So, let’s start the adventure together!
Benefits of Mounting a Dog Door on a Wall Surface
Comfort for You and Your Pet
One of the most significant advantages of installing a doggie door in a wall is the convenience it provides for you and your pet. Gone are the days of waking up in the middle of the night to let your dog out. With a doggie door, your pet can enjoy the freedom to go outdoors and come back without interrupting your routine.
Boosted Safety and Security
Today, restricted security attributes, such as digital locking mechanisms, are only accessible to Family pets wearing a specific collar tag. This ensures that undesirable pests and trespassers do not have straightforward access to your home.
Boosted Pet Dog Wellness
Regular access to the outdoors advertises exercise and mental excitement for your pet. This can help reduce behavior issues and promote a healthier, better animal.
Types of Pet Doors
Handbook Dog Doors
Hand-operated dog doors are the most common type and are typically opened when the pet presses a flap with their nose or paw. These doors are available in various materials, including plastic, aluminum, and others.
Digital Dog Doors
Digital doggie doors offer boosted protection. They use sensors that connect to your collar and open only when your pet approaches, preventing other pets from entering your home.
Moving Pet Doors
Sliding doggie doors are mounted within an existing sliding glass door framework. While these are generally simpler to set up, they might not supply as much insulation or protection as wall-mounted options.
Preparing for Installation
Picking the Right Location
Selecting the best location for your doggy door is critical. To decrease disturbances, consider placing the door in a less-trafficked area of your home. Choose an area that supplies quick access to your backyard or outdoor room.
Gauging Your Animal
Precise measurements guarantee your pet dog can comfortably travel through the doggie door. Please measure your Family pet’s width at the shoulders and the height from the floor to the top of their shoulders. These measurements will certainly help you select the best-sized door for your animal.
Collecting Necessary Tools and Products
Before you begin the setup procedure, make sure you have all the required devices and materials, including:
1. Measuring tape
2. Pencil
3. Degree
4. Jigsaw or reciprocating saw
5. Pierce and pierce bits
6. Screwdriver
7. Caulking weapon and weatherproof sealer
Step-by-Step Setup Refine
Action 1: Mark the Wall surface
Using a measuring tape and pencil, mark your pet’s heptagon on the wall. Then sketch a rough outline of the doggie-door theme on the wall. Ensure the lines are level for proper fit.
Action 2: Cut the Opening
Cut very carefully along the runout using a jigsaw or reciprocating saw. Put on safety goggles and a mask to protect yourself from dust and particles. Remove any insulation or blockages inside the wall cavity when the hole is reduced.
Action 3: Install the Doggy Door Structure
Put the doggie door structure directly into the opening and secure it with screws. Guarantee that the structure is level and flush with the wall surface. If the door includes an exterior frame, mount it next.
Step 4: Seal the Edges
Apply weatherproof sealer around the doggie doors to prevent drafts and moisture from entering your home. Correct sealing is vital for maintaining power performance and protecting your wall surfaces from water damage.
Step 5: Examine the Door
Encourage your pet dog to use the door by guiding it through it a few times. Ensure the door flap swings open and your pet feels comfortable using it. Adjust any settings on digital doors as required.
Usual Issues and Solutions
Door Not Closing Properly
If the door does not close properly, look for obstructions or misalignment in the frame. Adjust the frame or joints as needed to ensure a tight fit.
Drafts and Leakages
To prevent drafts and leaks, ensure you have applied enough sealant along the sides of the door. Furthermore, consider adding climate stripping to enhance insulation.
Training Your Animal
Some pet dogs might initially be reluctant to use the new door. Use treats and positive reinforcement to encourage them to experience it. Allow your dog time to adjust, and be patient during training.
Keeping Your Doggy Door
Regular Cleaning
Regularly clean the doggie door flaps and structures to avoid dust and debris buildup. This will ensure a smooth procedure and extension.
Upgrading Security Functions
If you have an electronic doggie door, ensure the batteries in your tag are functioning properly. Likewise, periodically check for software applications or firmware updates to keep your protection features up to date.
How to Install a Doggie Door on a Wall
Careful carpentry is essential when installing a wall pet door, especially when cutting through the exterior wall.
The good thing is that you don’t have excellent skills to cut through. Just moderate carpentry skills, combined with careful cutting, are enough for a quality installation.
Step 1: Know how skillful you are
This is usually the first step in almost installing anything in your home. So, how good are your carpentry skills?
Can you make a nearly perfect cut with the correct measurements? Remember, if you have doubts, hire out!
Step 2: Find the Best Location for Installation
Before cutting, double-check both sides of the wall to ensure they are free from electrical or cable wires, pumping pipes, and load-bearing studs.
Generally, these are the key factors to consider when searching for the ideal location.
1. Ensure there are no cables, studs, or pumping pipes
2. Determine how high from the ground the pet door should be installed
3. Check if the bed door will fit between the studs or if the studs can be quickly and safely removed
If you have a back garden, the ideal wall to install a pet door will allow direct access to that garden.
Therefore, knowing where the installed studs and wires reside in your walls is the first step to preventing damage and, more importantly, injuries.
After marking the perfect location to install your dog’s, mark the wall for where to drill or cut.
If you are given a template paper, you should cut or drill four inspection holes in the wall where you want to install the door, as shown in the paper. It’s best to place the template paper on the perfect wall location, then drill it.
Step 3: Cut out the wall
Make a straight, clean cut from one hole to another with a reciprocating saw or similar tool. Most pet doors include an installation template that guides you through the process, accounting for factors such as size, shape, and other relevant details.
To have a correctly installed door, you must follow the given sizing guidelines. If any insulation remains after cutting out the chart, save it; it may be useful later.
If there are studs in your chosen location, remove them; however, this is best and safest done by a carpentry expert.
If any areas or voids remain after cutting out the drywall, fill them with insulation. For unsupported edges, install 2x blocking behind them, screwing each to the sheathing for sturdy support.
Step 4: Add New Header
If you have removed any studs, it is recommended that you build a new header to provide proper support.
Screwing 2x6s to the sheathing will help support the cut stud, which can also be incorporated with a 1-inch foam insulation filler strip. This is ideal if you want the header to flush with the framing.
After adding the header, you must add support to both sides of the framing using a short 2×6. The added support should always fit tightly between the header and the bottom plate, which can be achieved by hammering.
Step 5: Cut the sheathing and trim the opening
You will need a reciprocating saw to cut out the sheathing and trim the opening.
After removing the outside siding and house wrap from the marked area, carefully cut out the sheathing, ensuring you make straight lines between the holes you created earlier.
When you remove the sheathing, cut/trim the dodooback slants towards the outside. This step is much easier since the drywall will quickly guide your blade.
Step 6: Installing the door
This is pretty much the last step, but it involves several mini-steps:
1. Flashing the sill
2. Waterproofing the opening
3. Attaching the interior
4. Exterior door panel or frame
5. Fitting the side liners and sill liners
These steps are straightforward but must be done in a specific sequence to avoid a roughly installed door or screwing and unscrewing the frames.
Therefore, to help with that, you should start by waterproofing the opening, fitting the inside panel, flashing the sill, installing the exterior panel, and finally, installing the liners.
Furthermore, when installing the liners, start with the sill liners, then the side liners.
How to Install a Doggie Door in a Wood Door
Installing a doggie door in a wooden door is a simple DIY project that can be completed in a few hours. Here are the steps to follow:
Materials Needed
1. Doggie door kit
2. Pencil
3. Tape measure
4. Drill
5. Jigsaw or reciprocating saw
6. Screwdriver
7. Sandpaper
Step 1: Choose the right location for the doggie door. Please measure your dog’s height from the floor to its shoulder, then add 2 inches to determine the door height. Measure your side point and add 2 inches to determine the door width.
Step 2: Using the measurements from step 1, mark the doggie door location on the wooden door with a pencil.
Step 3: Use a drill to make a hole in one corner of the marked area. This will allow you to insert the jigsaw blade or reciprocating saw.
Step 4: Cut along the marked area with the jigsaw or reciprocating saw. Follow the mama’s instructions for cutting the doggie door.
Step 5: Sand the hole edges to remove any roughness or sharpness.
Step 6: Follow the instructions provided with the doggie door kit to install the door. This typically involves attaching the frame to the door using screws.
Step 7: Test the doggie door to ensure it opens and closes properly. Encourage your dog to go through the door by using treats or toys.
Why are Doggy Doors Dangerous?
Doggy doors can pose several potential dangers, including:
Security risks: Doggy doors can create entry points for intruders, including burglars, wild animals, or other pets.
Health and safety hazards: If your pet can come and go freely, they may bring in parasites, diseases, or other harmful materials from outside. Additionally, small pets could become trapped in the door, and larger pets could get stuck or injured while entering or exiting.
Accidental access: Doggy doors can allow your pet to enter areas of your home you may not want them in, such as rooms containing dangerous items, like cleaning supplies or medications.
Energy efficiency: A doggy door can compromise your motorhome’s efficiency by allowing conditioned air to escape and unconditioned air to enter, increasing energy bills.
(FAQs)
Q: What tools do I need to install a doggie door on a wall?
A: The tools you will need to install a doggie door in a wall may vary depending on the specific installation kit and the materials you are working with, but typically you will need a drill, a jigsaw or reciprocating saw, a level, a measuring tape, a pencil or marker, a caulking gun, and screws or bolts. You may also need a saw to cut through the wall, a stud finder to locate any studs, and a pry bar to remove any existing trim or moulding.
Q: Can I install a doggie door on any wall?
A: A doggie door can be installed on any wall, but the installation process will vary depending on the type of wall you are working with.
For example, if you install a doggie door in an exterior wall, you must consider factors such as insulation and weatherproofing to ensure your installation is secure and energy-efficient.
Additionally, if you install a doggie door in a load-bearing wall, you must take special precautions to prevent compromising the wall’s integrity.
Q: How do I measure my dog for a doggie door?
A: To measure your dog for a doggie door, you must measure your dog’s height. Measure the height of your dog from the floor to the top of its body. To measure your dog, measure the widest point of your chest or hips.
Q: How do I cut a hole in the wall for a doggie door?
A: To cut a hole in the wall for a doggie door, follow the instructions in your doggie door installation kit. Typically, you will use the kit’s provided template to mark the hole’s location and size.
Then, you must cut through the wall along the marked lines with a saw. Be sure to follow all safety precautions when using power tools and avoid damaging any pipes or electrical wiring that may be hidden within the wall.
Q: How do I install a doggie door on a wall?
A: To install a doggie door on a wall, follow the doggie door installation kit instructions.
The process involves inserting the doggie door into the hole you have cut in the wall, securing it with screws or bolts, and sealing any gaps around the edges with caulk or weather-stripping. You may also need to install additional components with your installation kit, such as a security panel or a flap to keep out insects and debris.
Conclusion
These steps are generalized for installing a doggie door in a wall and apply to almost all doors.
Some doors may not have liners or other components. However, the most important thing is understanding the general installation principle: accurate cutting and proper checking of the installation space.
That’s how to install a pet door on a wall; I hope it was helpful. You can also check our other article on installing a magic gate here.
#DoggieDoorDIY #PawfectEntry #FurryFreedom #HomeImprovementFun #DogLifeHacks #PetFriendlyHome #WallToWoof #DIYDoggieDoor #HappyPups #CanineComfort