A hard hat may look simple, but its protection depends on more than the plastic shell’s strength. The suspension, headband, adjustment system, sweatband, accessory slots, and shell must function as a complete protective system.
A shell with an incorrectly installed suspension may sit too close to the head, fit unevenly, fall off during movement, or provide less protection than intended.
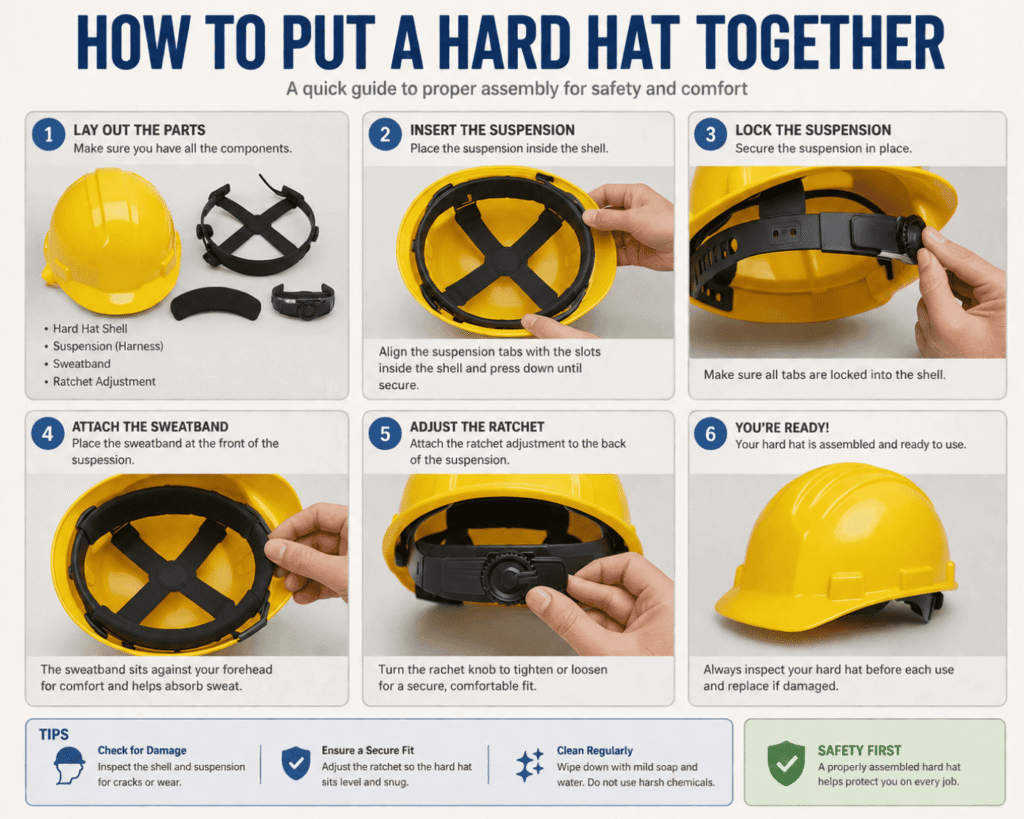
Learning how to put a 3m hard hat together is therefore an important workplace-safety task—not merely a matter of comfort.
In the United States, employers generally must provide appropriate protective helmets when workers face potential head injuries from falling objects, impact, flying objects, electrical shock, or burns. OSHA’s general-industry and construction standards also require qualifying head protection to meet specified consensus standards or provide equivalent protection. (OSHA)
Hard hat designs vary by manufacturer and model. The instructions in this guide explain the assembly process used by many conventional industrial hard hats, but they do not replace the user manual supplied with your specific product. Before beginning, verify that the shell, suspension, and accessories are approved for use together by the manufacturer.
Essential safety rule: Never force an incompatible suspension into a hard hat shell. A suspension that appears to fit may not have been designed or tested for that shell.
Understand the Parts of a Hard Hat
Before assembling the hard hat, identify each component and understand its purpose. This makes it easier to orient the suspension correctly and recognize missing or damaged parts.
| Hard Hat Component | Purpose | What to Check |
| Outer shell | Helps resist and deflect impact and penetration | Cracks, dents, cuts, chalking, discoloration or heat damage |
| Suspension system | Creates space between the shell and the wearer’s head while helping distribute impact forces | Torn webbing, broken clips, stretched straps or missing keys |
| Headband | Wraps around the wearer’s head and stabilizes the hard hat | Correct size, flexibility and secure attachment |
| Brow or sweat pad | Sits against the forehead and absorbs moisture | Cleanliness, correct front orientation and secure placement |
| Ratchet or pin-lock adjuster | Tightens or loosens the headband | Smooth operation and secure locking |
| Suspension keys or clips | Connect the suspension to designated shell slots | Cracks, deformation and complete engagement |
| Nape strap | Supports the lower rear portion of the head | Proper rear orientation and comfortable positioning |
| Chin strap, when approved | Helps keep the helmet in place during movement, falls or awkward work positions | Manufacturer compatibility, buckle function and secure attachment |
| Accessory slots | Accept approved earmuffs, face shields or other attachments | Damage, blockage and accessory compatibility |
The suspension is not decorative padding. It maintains a controlled space between the wearer’s head and the outer shell. Placing tools, gloves, cigarettes, paperwork or other objects in that space can interfere with the hard hat’s intended performance. Manufacturer instructions commonly warn users not to store anything between the suspension and shell.
Confirm that the suspension and shell are compatible to ensure the hard hat provides reliable protection and to build trust in proper assembly.
One of the most important steps in hard hat assembly happens before you snap anything into place.
Before assembly, emphasize verifying the suspension’s compatibility by checking the label inside the shell and confirming it matches the manufacturer’s approval for that specific hard hat model or series. This step is crucial to ensure safety and proper fit.
Do not assume that all four-point suspensions are interchangeable. Two suspension systems may have the same number of attachment clips but use different clip shapes, slot dimensions, webbing geometry, material strength, or impact-performance characteristics.
Before assembly, confirm the following:
1. The suspension is listed for your shell model
2. The suspension size is appropriate for the shell and wearer
3. All clips or suspension keys are present
4. The adjustment mechanism operates normally
5. No parts have been altered, repaired, or improvised
6. Any chin strap or accessory is approved for the same hard hat system
7. The shell label is present and readable
OSHA advises workers and employers to inspect labels and certification markings and to use manufacturer-compatible accessories. The agency also recommends checking that attachments are securely fastened and functioning correctly. (OSHA)
Why Mixing Hard Hat Parts Is Unsafe
Don’t choose a replacement suspension just because it fits into the shell. Hard hats are evaluated as systems, and changing one component can affect fit, clearance, impact distribution, and electrical properties.
Avoid:
1. Generic clips not approved by the shell manufacturer
2. Drilled holes for homemade attachments
3. Adhesive repairs to suspension keys
4. Wire, zip ties or tape used as replacement connectors
5. A suspension taken from a different hard hat brand
6. Unapproved cooling fans, lamps or communication accessories
7. A chin strap attached through holes drilled into the shell
If you cannot identify the correct suspension, remove the hard hat from service until the manufacturer or an authorized safety-equipment supplier confirms the proper replacement.
Inspect the Shell Before Assembly
Do not install a new suspension into an unsafe shell. Begin with the hard hat turned upright under good lighting.
Inspect the exterior and interior for:
1. Cracks or hairline fractures
2. Deep scratches, gouges, or cuts
3. Dents or deformation
4. Soft spots
5. Brittle or stiff plastic
6. Fading or a chalky surface
7. Burn marks
8. Chemical residue
9. Damaged suspension slots
10. Unauthorized holes, engraving, or modifications
11. Evidence of a previous impact
Run your fingers carefully across the shell to feel for irregularities that may be difficult to see. OSHA recommends inspecting the outer shell for cracks, dents, and other signs of damage before use. (OSHA)
A hard hat that has experienced a significant impact should be removed from service even when no damage is visible. OSHA explains that protective headwear may not retain its full effectiveness after an impact, while manufacturer instructions similarly direct users to dispose of an impacted hard hat immediately. (OSHA)
Do Not Attempt Structural Repairs
Never repair a damaged hard hat shell using:
1. Glue
2. Epoxy
3. Fiberglass patches
4. Heat
5. Screws
6. Staples
7. Plastic welding
8. Duct tape
9. Metal brackets
A repaired shell cannot be assumed to provide its original protection. Replacement is the appropriate response to structural damage.
Identify the Front and Back of the Suspension
Incorrect orientation is among the most common hard hat assembly mistakes.
Locate the brow pad or sweatband. On most conventional designs, the brow pad belongs at the front of the shell, beneath the brim. The adjustment knob, pin-lock strap, or nape section generally belongs at the back.
Manufacturers may mark the suspension with words or symbols such as:
- Front
- Back
- Forehead
- Nape
- Brim direction
- Directional arrows
If there is no obvious marking, consult the model-specific instructions rather than guessing.
For example, 3M’s H-700 and H-800 instructions direct the assembler to place the suspension inside the inverted shell with the brow pad facing the front brim. The company then instructs the user to insert each suspension key fully into its corresponding shell slot.
Why Orientation Matters
A backward suspension can cause:
1. The hard hat sits at an unintended angle
2. Reduced stability
3. Improper clearance between the head and shell
4. Pressure points around the forehead or neck
5. Poor adjustment
6. Incorrect positioning of the brim
7. Interference with eyewear or hearing protection
Unless the hard hat is specifically marked and approved for reverse wearing, do not wear it backward. OSHA states that only head protection bearing the appropriate reverse-wearing marking should be used in reverse. (OSHA)
Turn the Hard Hat Shell Upside Down
Place the hard hat upside down on a clean, stable surface, resting it gently on the crown.
Use a surface that will not scratch the shell. A clean workbench, rubber mat, or folded cloth is preferable to rough concrete.
Keep chemicals, solvents, gasoline, adhesives and paints away from the assembly area. Certain substances can damage the shell material or reduce its resistance to impact and penetration. Manufacturer guidance generally recommends cleaning hard hats only with mild soap and water unless the product instructions specify another approved method.
With the shell inverted, position the suspension inside it without attaching the clips yet. Confirm that:
1. The sweatband points toward the front
2. The adjustment mechanism points toward the rear
3. The webbing is not twisted
4. Each suspension key lines up with a designated slot
5. The straps form a centered support cradle
6. No part of the headband is trapped beneath the webbing
This dry positioning step can prevent an incorrectly oriented suspension from being fully installed.
Insert the First Suspension Key
Begin with the front attachment point unless the manufacturer specifies a different sequence.
Some suspension keys must be folded outward or rotated before insertion. Others slide directly into the shell slot. Examine the key and slot shapes carefully.
To install the first key:
1. Align the suspension key with the matching slot
2. Hold the key by its reinforced plastic section rather than pulling on the fabric webbing
3. Slide or press the key into the slot in the direction shown by the manufacturer
4. Continue until the key is fully seated
5. Gently tug the attachment to confirm that it is locked
You may feel or hear a click, but not every system produces an audible sound. Visual inspection is still necessary.
Do not hammer the key into place or use pliers to crush it into the slot. Excessive force may damage the clip or shell. If the clip will not seat with reasonable hand pressure, stop and verify its orientation and compatibility.
Install the Remaining Suspension Keys
After securing the first key, attach the remaining keys one at a time.
A balanced sequence can make the process easier. For a four-point suspension, this often means installing the opposite key next and then completing the remaining two. For systems with additional attachment points, work gradually around the shell while keeping the suspension centered.
Follow these steps:
1. Keep the webbing untwisted
2. Align the next key with its designated slot
3. Push the key fully into place
4. Check that the previous key has not loosened
5. Repeat until every attachment point is connected
6. Inspect each connection from more than one angle
Manufacturer-specific procedures may differ. In its instructions for certain Type I hard hats, 3M directs users to repeat the key-insertion procedure for the remaining suspension points, then press down at the center cross of the webbing to confirm the clips are secured, and the webbing is ready for use.
What “Fully Seated” Looks Like
A properly installed key ordinarily:
1. Sits flush within its slot
2. Does not lean sideways
3. Does not pop out under a light tug
4. Is not partially visible above its intended locking position
5. Does not distort the surrounding shell
6. Holds the webbing at an even height
Check every key. Three secure clips and one loose clip do not complete the installation.
Center and Open the Suspension Webbing
New suspension webbing may feel tight or remain folded from packaging. Once all attachment keys are secure, gently open the webbing so that it forms a cradle rather than a flat bundle.
Press the center of the webbing downward with your hand only when the manufacturer’s instructions call for this action. Do not stretch the straps aggressively.
The completed suspension should:
1. Hang evenly inside the shell
2. Create a visible gap between the head cradle and shell
3. Remain centered
4. Have no twisted straps
5. Keep hard plastic clips away from the intended contact points on the head
6. Allow the headband to form a smooth circle
Do not cut, shorten, knot, or sew the webbing. The straps are positioned and tensioned as part of the suspension design.
Adjust the Hard Hat Size
Once the suspension is installed, turn the hard hat upright and place it on your head.
For a Ratchet Suspension
1. Loosen the ratchet before putting on the hard hat
2. Position the front sweatband across the forehead
3. Seat the rear strap low enough to stabilize the hard hat
4. Turn the ratchet knob until the headband feels snug
5. Stop before the band creates painful pressure
For a Pin-Lock Suspension
1. Remove the hard hat
2. Open the pin-lock connection
3. Select a larger or smaller adjustment hole
4. Reconnect the pins completely
5. Put the hard hat on and test the fit
6. Repeat until the hat is secure without excessive pressure.
A proper fit should be comfortable and stable—not painfully tight. OSHA recommends adjusting the suspension to achieve a snug fit without excessive pressure points and warns that head protection should be neither too loose nor too tight.
Basic Hard Hat Fit Test
With the hard hat correctly positioned:
1. Bend forward slowly
2. Look upward and downward
3. Turn your head left and right
4. Walk several steps
5. Perform a gentle side-to-side head movement
The hard hat should remain stable during normal movement. It should not slide over your eyes, rotate freely, rock dramatically, or fall off.
This is not a reason to overtighten the suspension. Persistent instability may indicate:
1. Incorrect assembly
2. Wrong suspension size
3. Incorrect vertical adjustment
4. A damaged headband
5. An incompatible suspension
6. The need for a manufacturer-approved chin strap or different helmet design
Adjust the Wearing Height When the Model Allows It
Some hard hat suspensions include vertical-adjustment positions that change how high or low the shell sits on the head.
A lower setting may feel more secure, while a higher setting may provide additional ventilation or clearance. The correct choice depends on the manufacturer’s approved adjustment range, the worker’s head shape, and the need to coordinate the hard hat with other protective equipment.
When changing the vertical position:
1. Remove the hard hat
2. Locate the height-adjustment tabs or slots
3. Move each adjustment point equally
4. Reinstall any released component completely
5. Confirm that the webbing remains centered
6. Put on the hard hat and repeat the movement test.
Do not leave one side higher than the other. Uneven adjustment can tilt the shell and create pressure points.
The hard hat should not sit so low that it obstructs vision or interferes with safety glasses. It should not sit so high that it becomes unstable.
Determine Whether a Chin Strap Is Needed
Traditional hard hats and modern safety helmets do not all use the same retention system. Some models accept an optional manufacturer-approved chin strap, while others include a chin strap as an integral component.
OSHA notes that chin straps can help keep head protection in place during awkward positioning, slips, falls, and work at height. The agency suggests considering Type II head protection with chin straps for certain construction environments and for work performed at heights.
Use only a chin strap that the manufacturer approves for your exact helmet or hard hat system.
Attach it only to designated connection points. Do not:
1. Drill holes into the shell
2. Tie cord around the suspension
3. Use an improvised strap
4. Attach the strap to accessory slots unless specifically instructed
5. Mix clips from another manufacturer
After installation, adjust the chin strap so it retains the head protection without choking, causing severe pressure, or interfering with other personal protective equipment.
Check the Hard Hat Type and Electrical Class
Correct assembly does not compensate for selecting the wrong form of head protection.
OSHA recognizes two impact types and three electrical classes:
| Designation | General Protective Capability |
| Type I | Designed to protect primarily against blows to the top of the head |
| Type II | Designed to protect against blows to the top and sides of the head |
| Class G | Provides limited protection against low-voltage electrical conductors and is proof-tested at 2,200 volts |
| Class E | Designed for higher-voltage electrical exposure and is proof-tested at 20,000 volts |
| Class C | Provides no intended protection against electrical contact |
These classifications describe tested performance; they should not be treated as permission to contact energized conductors. Electrical hazards require a comprehensive safety program, appropriate work practices, and correctly selected personal protective equipment.
Do not select vented Class C hard hats where electrical protection is required. OSHA’s safety bulletin specifically states that vented hard hats or safety helmets cannot be used for electrical work.
Check the permanent label inside the shell rather than relying on color, appearance, or a seller’s informal description.
Install Only Approved Accessories
Workers may need to combine head protection with:
1. Hearing protectors
2. Face shields
3. Safety goggles
4. Welding equipment
5. Communication systems
6. Lamp brackets
7. Sun shades
8. Winter liners
9. Chin straps
Evaluate every accessory for compatibility.
An accessory that physically attaches to a slot is not automatically approved. It may change the helmet’s balance, reduce electrical performance, prevent secure seating, or interfere with other personal protective equipment.
Before adding an accessory:
1. Verify the accessory model
2. Confirm compatibility with the exact hard hat
3. Read both sets of instructions
4. Inspect the mounting points
5. Attach the accessory without modifying the shell
6. Test the complete configuration for fit and function
7. Reinspect the hard hat after removal of the accessory
NIOSH advises workers to make sure hearing protection is compatible with other safety equipment, noting that some earmuffs can interfere with hard hat fit.
Perform a Final Assembly Inspection
Before the hard hat enters service, conduct a complete inspection.
Hard Hat Assembly Checklist
| Inspection Point | Pass Condition |
| Shell | No cracks, dents, chemical damage, or unauthorized modifications |
| Product label | Present, readable and appropriate for the hazard |
| Suspension compatibility | Correct make and model for the shell |
| Suspension direction | Brow pad at the front and adjustment system at the rear |
| Attachment keys | Every key fully engaged |
| Webbing | Centered, open and untwisted |
| Headband | Smooth, flexible and undamaged |
| Adjuster | Locks securely and operates normally |
| Shell clearance | No objects stored between suspension and shell |
| Fit | Snug, stable and free from severe pressure points |
| Chin strap | Approved, properly attached and adjusted when required |
| Accessories | Manufacturer-approved, secure and functional |
| Impact history | No known significant impact |
Document the date the hard hat entered service, particularly when your employer maintains a personal-protective-equipment inspection program. OSHA recommends maintaining inspection records and noting purchase dates, findings, and corrective actions.
Common Hard Hat Assembly Mistakes
Mistake 1: Installing the Suspension Backward
The forehead pad ends up at the rear, causing improper brim orientation and poor stability.
Correction: Remove the suspension and reinstall it according to the front and rear markings.
Mistake 2: Leaving One Clip Partially Connected
A loose clip may release during movement or impact.
Correction: Inspect every attachment individually and press each key fully into its designated slot.
Mistake 3: Twisting the Webbing
Twisted straps can produce uneven support and uncomfortable pressure.
Correction: Release the affected attachment points, untwist the webbing, and reinstall the suspension.
Mistake 4: Mixing Brands or Models
A replacement suspension appears to fit but is not approved for the shell.
Correction: Use only the manufacturer-specified replacement.
Mistake 5: Wearing the Hard Hat Too Loose
The shell slides, rotates, or falls during normal movement.
Correction: Adjust the ratchet or pin-lock system until the fit is stable and comfortable.
Mistake 6: Overtightening the Headband
The wearer develops a headache or painful pressure around the forehead.
Correction: Loosen the adjustment slightly and evaluate the wearing height and suspension size.
Mistake 7: Keeping Objects Under the Shell
Gloves, paperwork, or personal items occupy the protective clearance space.
Correction: Remove all objects. Never use the suspension area as storage.
Mistake 8: Modifying the Shell
The user drills ventilation holes, engraves a name or installs homemade equipment.
Correction: Remove the altered hard hat from service. Manufacturers warn against puncturing, modifying, or engraving the shell and suspension.
Mistake 9: Wearing an Impacted Hard Hat
The shell looks normal after being struck, so it remains in use.
Correction: Retire it immediately. Internal or material damage may not be visible.
Cleaning and Storage After Assembly
Proper care helps preserve the shell and suspension.
Clean the hard hat using mild soap and water, unless the manufacturer provides different approved instructions. Rinse away residue and allow all parts to air-dry.
Avoid using:
1. Gasoline
2. Paint thinner
3. Acetone
4. Harsh industrial cleaners
5. Unapproved disinfectants
6. Solvents
7. Adhesives
8. Abrasive pads
Do not leave a hard hat on a vehicle dashboard, rear-window shelf, or another location exposed to extreme heat and direct sunlight. OSHA advises storing head protection away from direct sunlight, extreme temperatures, and chemicals.
Store the hard hat:
1. In a clean, dry location
2. Away from ultraviolet exposure
3. Away from chemical vapors
4. Away from sharp tools
5. Without heavy objects placed on top
6. At a temperature permitted by the manufacturer
7. In a manner that does not distort the suspension
Inspect it again before the next use.
When to Replace the Suspension or Shell
No single universal replacement date applies to every hard hat. Service life depends on the product, the manufacturer’s recommendations, the work environment, frequency of use, chemical exposure, ultraviolet radiation, temperature, storage, and impact history.
Replace the suspension immediately when you find:
1. Frayed webbing
2. Torn stitching
3. Cracked keys
4. Stretched straps
5. Lost flexibility
6. Broken adjustment parts
7. Missing attachment components
8. Severe contamination
9. Inability to maintain a secure fit
Replace the shell immediately when you find:
1. Cracks
2. Dents
3. Cuts or gouges
4. Brittleness
5. Chalking
6. Deformation
7. Burn damage
8. Chemical damage
9. Unauthorized modification
10. Evidence of significant impact
Some manufacturers publish time-based replacement recommendations. For example, 3M has recommended replacing certain suspensions at least every 12 months and certain shells within five years, depending on environment and use. Those figures are manufacturer recommendations for applicable products—not a universal OSHA replacement schedule.
Frequently Asked Questions About Hard Hat Assembly
Can I assemble a hard hat without its instruction manual?
Obtain the model-specific instructions before assembly. Many manufacturers provide digital manuals using the model or part number printed inside the shell. Generic instructions may help you understand the process, but clip direction, suspension height, and accessory installation can differ.
Should the adjustment knob face forward or backward?
On most conventional ratchet suspensions, the adjustment knob belongs at the back of the head. Confirm this using the manufacturer’s markings and instructions.
How much space should be between my head and the shell?
The suspension should create the clearance intended by the manufacturer. Do not attempt to measure or modify that space using a universal homemade specification. Correct installation of the approved suspension establishes the designed clearance.
Can I wear a hard hat backward?
Only when the head protection has been tested and marked for reverse wearing and is configured according to the manufacturer’s instructions.
Can I use a suspension from an older hard hat?
Only when the manufacturer identifies it as compatible, and the suspension is undamaged and within the manufacturer’s service recommendations. Never transfer a used suspension just because its clips look similar.
Can I place padding inside the hard hat?
Do not add unapproved foam, fabric, folded material, or other padding between the head and suspension or between the suspension and shell. Use only manufacturer-approved comfort components and cold-weather liners.
Why does my new hard hat feel too high?
The vertical suspension position may need adjustment, the webbing may not be fully opened, or the suspension may be the wrong size. Follow the approved height-adjustment procedure rather than modifying the straps.
Why does the suspension keep popping out?
The key may be backward, partially seated, damaged, or incompatible with the shell. Remove the hard hat from service until you correct the cause. Do not secure the key with glue, tape, or wire.
Is a bump cap assembled in the same way?
No. A bump cap is not a substitute for an industrial hard hat where impact, falling-object, or electrical hazards require protective headwear. Use the protective equipment selected through the employer’s workplace-hazard assessment.
Final Safety Summary
Knowing how to put a hard hat together means more than snapping four clips into a plastic shell. Correct assembly requires compatible components, proper suspension orientation, fully seated attachment keys, untwisted webbing, appropriate fit, and a final inspection.
A hard hat is personal protective equipment, not ordinary clothing. Never drill, engrave, heat, reshape or improvise repairs. Never mix unapproved components. Most importantly, never treat a completed assembly as permanent: inspect the shell, suspension and accessories before every use.
When assembled correctly and selected for the actual workplace hazards, a hard hat can form a critical part of a broader head-injury-prevention program. Hazard controls, safe work practices, employee training and consistent workplace supervision must still support it.
Secondary Keywords: hard hat assembly, install hard hat suspension, hard hat fitting instructions, OSHA hard hat requirements, construction safety equipment
HardHat #SafetyHelmet #ConstructionSafety #PPE #PersonalProtectiveEquipment #WorkplaceSafety #SafetyFirst #HardHatAssembly #SafetyTraining #Construction #IndustrialSafety #SafetyTips #JobsiteSafety #SafetyGear #ProtectiveEquipment #WorkSafety #DIYGuide #HowTo #ConstructionWorkers #OccupationalSafety #OSHA #Engineering #Builders #SafetyAwareness #ToolboxTalk #WorkplaceTraining #IndustrialWorkers #HelmetAssembly #SafetyEducation #ConstructionLife