Do you know how to assemble a hard hat 3m? Assembling a 3M hard hat typically involves assembling its components in the correct order to ensure the hard hat provides the necessary protection for the wearer’s head. The different components of a 3M hard hat may include a shell, a suspension system, and a chin strap.
The shell is the hard outer covering of a hard hat, designed to absorb and distribute the force of an impact. The suspension system is the internal part of the hard hat that helps to absorb and distribute the force of an impact.
As well as providing a comfortable and secure fit for the wearer’s head. The chin strap, if included, is a safety feature that helps keep the hard hat in place on the wearer’s head during sudden movement or impact.
Assembling a 3M hard hat typically involves securely installing the suspension system inside the hard hat’s shell, adjusting it to fit the wearer’s head, attaching the chin strap if included, and inspecting the hard hat for any damage or wear before use.
A Hard Hat 3m
A Hard Hat, also known as a 3M Hard Hat, is a type of protective headgear commonly used in construction and industrial settings. It is designed to protect the wearer’s head from falling objects, electrical hazards, and other workplace hazards.
The 3M company produces a variety of hard hats with different features and levels of protection, such as suspension systems, ventilation, and reflective materials.
The term “3M” refers to a multinational corporation based in the United States that manufactures hard hats and specializes in the development and production of a wide range of products for various industries.
How to Assemble a Hard Hat 3M: A Comprehensive Guide for Small Businesses
Security is a must in every job, so as a small business owner, you are responsible for ensuring your employees’ safety. The most essential element of the safety equipment is a hard helmet. In this post, we’ll guide you through the steps to assemble a 3M hard hat, ensuring you meet your employees’ safety requirements and comply with regulations.
Why a Hard Hat is Essential
According to the Occupational Safety and Health Administration (OSHA), approximately 84,000 head injuries happen annually on the job. Wearing a properly assembled and properly worn hard hat can help save lives and prevent serious accidents. For small business owners, putting together the right hard hats reduces risk and creates a secure workplace.
Understanding the Components of a 3M Hard Hat
Before jumping into the assembly procedure, it is essential to comprehend the components that make up the 3M hard hat
1. The shell is the solid outer layer that offers protection against impact.
2. Suspension System: The system comprises the straps for the crown and other parts that spread the weight of the hat evenly.
3. Chin Strap: An optional feature; however, it is recommended for extra security.
4. Sweatband: It improves the feeling of comfort and absorbs sweat.
5. Accessories: This could include goggles, earplugs, and various other attachments.
Step-by-Step Guide on How to Assemble a Hard Hat 3M
Step 1: Inspect the Shell and Suspension Systems
Before beginning the assembly Before starting the assembly:
1. Check the shell and suspension system for any damage or imperfections
2. Examine for cracks and dents
3. Assure the components are all in place and good shape
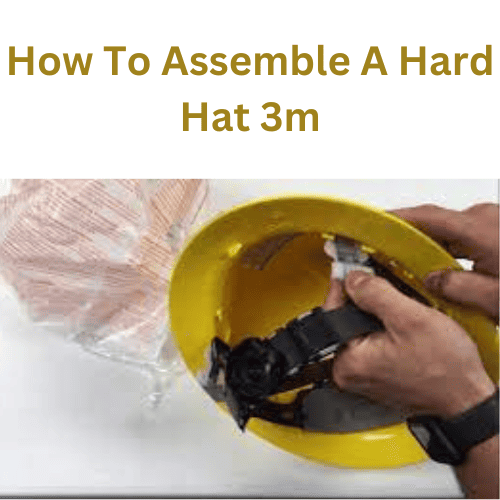
Step 2: Attach the Suspension System to the Shell
Align the Suspension
Install the suspension within the shell, with the side of the suspension (often indicated) in line with the front of the shell. This is essential to ensure proper fit and stability.
Insert the Tabs
Most 3M hard hats come with slots or tabs that connect the suspension system to the outer shell. Place these tabs in the slots similarly until you hear a clicking sound. This sound indicates that the suspension system has been securely attached.
Step 3: Adjust the Headband and Crown Straps
Adjust the Headband
The headband should be adjusted to fit comfortably on your head. Most 3M hard hats can adjust headbands using a ratchet mechanism or a pin lock. You can change the headband until it fits perfectly and is not overly restrictive.
Adjust the Crown Straps
The crown straps must be adjusted to ensure the hard hat rests 1-1.25 inches above the head. This position ensures that the power of impact is equally dispersed.
Step 4: Attach and Adjust the Chin Strap
If you have a chin strap (highly advised for jobs that require large movements), connect it to the specified locations in the shell. The strap should be adjusted so it sits comfortably beneath your cheeks.
Step 5: Add Any Additional Accessories
Depending on your workplace requirements, you might need to wear ear protection and masks. Each item will have distinct attachment points on the hard helmet. Make sure these attachment points are secured according to the manufacturer’s instructions.
Common Mistakes to Avoid When Assembling a Hard Hat
Incorrect Strap Positioning
Incorrect positioning of the crown straps and the headband may cause discomfort and less security. Be sure to check the straps’ position and alignment.
Not Wearing the Hard Hat Correctly
Wearing the hard hat with the brim facing forward is crucial. A reversed hat can significantly reduce its effectiveness, exposing you to potential dangers. Always ensure you’re wearing it correctly.
Ignoring Manufacturer’s Instructions
Always follow the manufacturer’s guidelines for assembly and adjustments. Specific models might have particular needs.
Maintenance Tips for Your 3M Hard Hat
Ensure that your hard hat is well-maintained and requires frequent maintenance. Here are a few tips:
Regular Inspections
Examine the hard hat regularly to check for signs of wear and wear. Repair any parts that show signs of wear and tear.
Cleaning
Wash the hard hat with a mild detergent and soap. Beware of harsh chemical products that can weaken the material.
Storage
Store hard hats in a dry, cool space away from direct sunlight and chemical exposure. Avoid environments with high temperatures, as they could cause the material to degrade.
Why Compliance Matters
OSHA compliance is not just a formality; it’s a necessity for all businesses. Non-compliance can lead to significant penalties and, more importantly, a higher risk of injuries. This could not only affect your reputation but also your financial health. Ensuring compliance requires the use of proper safety gear, including well-constructed hard hats.
According to OSHA, companies could face penalties of up to $13,653 for each infraction. This highlights the importance of adhering to safety rules and the potential financial consequences of non-compliance.
Specification
Assembling a 3M hard hat is straightforward. Here are the steps you can follow:
1. Open the package and take out all the parts of the hard hat. You should have the hard hat shell, suspension system, and headband.
2. Insert the suspension system into the hard hat shell. To do this, align the four suspension system points with the corresponding holes in the hard hat shell. Press down on the suspension system until it snaps into place.
3. Attach the headband to the suspension system. Slide the ends of the headband into the slots on the suspension system, making sure the headband is centered. Pull the headband down to make sure it’s securely attached.
4. Adjust the suspension system to fit your head size. Most 3M hard hats come with an adjustable suspension system that lets you fit it to your head size. Use the ratchet or pin-lock system to adjust the suspension system until the hard hat fits snugly on your head.
5. Make sure the hard hat is level on your head. Tilt your head forward and backward to check if the hard hat stays in place. If it slides forward or backward, adjust the suspension system until the hard hat stays in place.
6. Check the chin strap (if applicable) to make sure it’s secure. If your 3M hard hat has a chin strap, make sure it’s adjusted to fit snugly under your chin.
(FAQs)
Q: Is it difficult to assemble a 3M hard hat?
A: No, it’s not difficult to assemble a 3M hard hat. The process is straightforward, and you should be able to assemble it in a few minutes by following the manufacturer’s instructions.
Q: Can I assemble the hard hat without the instructions?
A: It’s best to follow the manufacturer’s instructions when assembling a hard hat, especially if it’s your first time. However, if you’re experienced with hard hats, you may be able to assemble it without the instructions.
Q: Can I adjust the suspension system after I’ve assembled the hard hat?
A: Yes, you can adjust the suspension system after you’ve assembled the hard hat. Most 3M hard hats come with an adjustable suspension system that lets you fit it to your head size.
Q: Can I replace the suspension system or headband if it becomes damaged or worn out?
A: Yes, you can replace the suspension system or headband if it becomes damaged or worn out. You can order replacement parts from the manufacturer or a supplier.
Q: What do I do if I have trouble assembling the hard hat?
A: If you have trouble assembling the hard hat, you can refer to the manufacturer’s instructions or contact their customer support for assistance. Additionally, many online resources can help you assemble a hard hat.
Conclusion
Assembling a hard hat is a crucial step in ensuring safety when working in areas where head injuries are a risk. 3M hard hats are designed to be easy to assemble, and you can follow the manufacturer’s instructions to assemble one in just a few minutes.
If you have any questions or concerns about assembling your 3M hard hat, you can refer to the manufacturer’s instructions or contact their customer support for assistance.
Additionally, it’s always important to wear your hard hat when working in areas where there is a risk of head injury and to replace it if it becomes damaged or worn out.
#HardHatHustle #3MAssembly #SafetyFirst #ConstructionVibes #GearUp #DIYSafety #HardHatLife #WorkSmart #SafetySquad #BuildItRight #HelmetOn #GetItDone #3MStyle #ProtectYourHead #AssembleWithEase #SafetySavvy #HardHatHeroes #OnTheJob #ConstructionLife #WorkplaceSafety #CraftyConstruction #HeadgearGoals #SafetyIsKey #3MInnovation #JobSiteReady #HardHatTips #StaySafeOutThere #AssemblyMagic #ToolTime #SafetyGearGoals #BuildAndProtect


