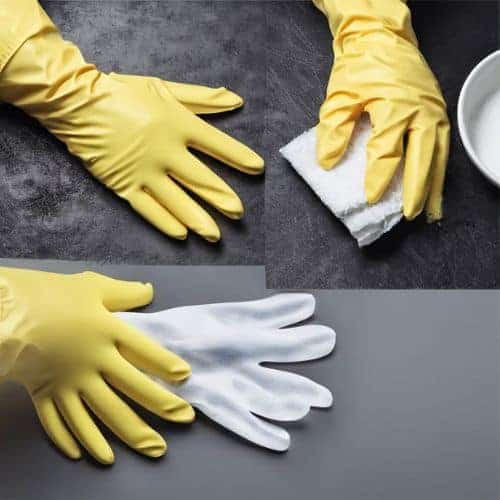
Learn how to clean rubber gloves. Rubber gloves are a vital household item that can be used for a wide range of tasks. Whether washing dishes, cleaning the bathroom, or working in the garden, rubber gloves protect your hands and protect them from potential harm.
However, like any other item, rubber gloves require regular cleaning to maintain effectiveness and longevity. In this article, we will delve into the proper way to clean rubber gloves.
Firstly, it is essential to note that rubber gloves should be cleaned after each use to prevent the advertisement of dirt, germs, and bacteria. Cleaning is easy and can be done using essential household items.
Remove the gloves from your hands and turn them inside out. This will expose the outer surface, usually the most soiled part. Gently shake or tap the gloves on a hard surface to remove any loose particles or debris.
Next, rinse the gloves thoroughly under running water. This will help to release any remaining dirt or residue. Rinse the gloves inside and outside, paying extra attention to the areas around the fingers and cuffs.
Once the gloves are rinsed, fill a basin or bowl with warm water and add mild liquid detergent. Avoid harsh cleaning products or bleach, which may damage the rubber material. Gently mix the water to create a buttery solution.
Place the gloves in soapy water and use your hands to agitate them, ensuring that all surfaces are submerged in the soapy solution. Rub the gloves together to create friction, which helps remove stubborn stains or grime. You can also gently scrub the gloves with a soft brush or sponge.
After scrubbing, rinse the gloves under running water to remove the soap residue. Make sure to rinse thoroughly, as any leftover detergent can cause skin irritation when wearing the gloves next time.
Lastly, dry the rubber gloves entirely before storing them. You can pat them dry with a sterile towel or leave them to air dry. Avoid wringing or twisting the gloves, which can damage their shape and elasticity.
Cleaning rubber gloves is a simple process that involves rinsing, washing with mild detergent, and thoroughly drying. By following these steps, you can maintain the cleanliness and effectiveness of your rubber gloves, ensuring they serve their purpose correctly.
Regularly cleaning your rubber gloves keeps them hygienic and extends their lifespan, saving you money in the long run. So, next time you use your rubber gloves, remember to clean them afterward for a safe, productive cleaning experience.
Rubber Gloves
Rubber gloves are an essential tool for cleaning. They protect our hands from harsh chemicals, hot water, and dirty surfaces. However, rubber gloves can get messy and grimy over time, like any other cleaning tool. It is essential to clean them regularly. This article will examine simple steps to cleaning rubber gloves effectively.
1. Start by rinsing off any excess dirt or debris from the gloves. Hold each glove under running water and use your fingers to remove any visible dirt or soil. This initial rinse will help to remove loose particles that might be present on the surface.
2. Fill a clean sink or basin with warm water. Add a few drops of mild dish soap or laundry detergent to the water. Stir the water gently to create a buttery solution.
3. Submerge the gloves completely in the soapy water. Ensure they are fully immersed and allow them to soak for a few minutes. This will help to break down any challenging paint or dirt on the gloves.
4. Gently rub the gloves together while they are submerged in the water. Use your fingers to work the soapy solution into the gloves’ material. Pay extra attention to areas that are mainly stained or dirty.
5. After rubbing the gloves, take them out of the soapy water. Flush them thoroughly under running water to remove any soap residue. Rinse both the inside and outside of the gloves to ensure complete cleanliness.
6. Once the gloves are rinsed, squeeze out any excess water. Do not twist or wring the gloves, which may damage the material.
7. Roll the gloves in a clean towel to aid in drying. Gently press the towel against the gloves to absorb the moisture. This will increase drying time and prevent unpleasant odors from developing.
8. Allow the gloves to air dry completely before storing them. Please place them in a well-ventilated area, away from natural sunlight or heat sources, to prevent any damage or distortion to the material.
How To Clean Rubber Gloves
Rubber gloves are handy for a variety of household tasks, from washing dishes to gardening. However, just like any other item, they require regular cleaning to maintain their functionality and prevent the growth of bacteria or mold.
Cleaning rubber gloves not only helps extend their lifespan but also ensures they remain hygienic and safe to use. If you’re unsure of how to clean your rubber gloves properly.
Preparing for Cleaning
Before you begin cleaning, ensure you have all the necessary supplies ready. You’ll need mild detergent or dish soap, friendly water, a clean sponge or cloth, and a drying rack or towel.
Inspect for Tears or Damage
It’s essential to check your gloves for any holes or tears before cleaning. If you find any, it’s best to replace them rather than attempt to repair them.
Washing
Fill a bowl or sink with generous water and add mild detergent or dish soap. Swirl the mixture to create soapy water. Submerge the gloves in the soapy water and gently rub them together to clean the inside and outside.
Please pay attention to any heavily soiled areas and give them extra attention. Avoid using powerful chemicals or abrasive cleaners, as they may damage the gloves.
Rinse Thoroughly
After washing, rinse the gloves thoroughly with clean water. Remove all traces of soap from both the inside and outside of the item. Residual soap can cause skin irritation or reduce grip when using gloves.
Drying
Once the gloves are clean, squeeze out any excess water. You can shake them gently to remove more water. Place the gloves on a drying rack or spread them on a clean towel.
Ensure proper air circulation to allow them to dry completely. Avoid hanging them in direct sunlight or using natural heat to speed up drying, as both can damage the rubber.
Storage
After drying, store your gloves in a clean and dry area. Avoid placing them near sharp objects or chemicals that may cause damage. Some prefer to powder the gloves with cornstarch or talcum powder before storing them to prevent sticking.
Regular Maintenance
It’s essential to clean them after each use. Rinse any dirt or chemicals off as soon as possible, even if you plan to reuse them right away. Maintaining a regular cleaning routine can prevent grime buildup and reduce the risk of odor development.
How to Wash or Clean Reusable Gloves
Reusable gloves are a fantastic way to protect your hands during chores or activities that may pose a risk of contamination. These gloves are designed for multiple use, saving you money in the long run.
However, reusable gloves require regular cleaning like any other item that comes into contact with dirt and germs. Here’s a step-by-step guide to effectively washing your reusable gloves.
Gather the Necessary Supplies
Before you start cleaning, ensure you have all the necessary items. This includes mild dish soap or laundry detergent, a clean towel or sponge, and a sink or basin large enough to accommodate your gloves.
Turn the Gloves Inside Out
To ensure a thorough cleaning, turn the gloves inside out. This will expose the dirtiest areas of the gloves, such as the interior palm and finger areas.
Rinse off excess dirt
Hold your gloves under running water to remove loose dirt or debris. Gently squeeze and flex the gloves to release any trapped dirt or residue.
Prepare a Soapy Solution
Fill your sink or basin with plenty of water, then add a mild dish soap or laundry detergent. Mix the solution well until it becomes sudsy but not too foamy.
Submerge the Gloves
Place your gloves in the soapy water, ensuring they are fully immersed. Use your hands and gloves to agitate the water, helping to loosen and remove any dirt, stains, or odors.
Scrub Gently
Using a clean towel or sponge, thoroughly clean the surface of the gloves. Pay extra attention to the fingers, palms, and other areas that accumulate grime.
Rinse Thoroughly
After scrubbing, rinse the gloves under running water to remove all the soapy residue. Ensure all soap has been washed away, as any leftover residue can irritate your skin.
Dry the Gloves
Once rinsed, gently squeeze out the excess water from the gloves. To promote proper drying and prevent mildew or mold growth, lay the gloves flat on a clean towel or turn them up to air dry. Avoid using a heating source to speed up the drying cycle, as this can cause damage to the gloves.
Store Properly
Once your gloves are fully dry, store them in a clean and dry location. Avoid placing them in humid or wet areas, as this can cause them to deteriorate or develop an unpleasant smell.
How to Disinfect Rubber Gloves
Rubber gloves are essential for a wide range of tasks, from cleaning to medical procedures. However, as with any other personal protective equipment, it is crucial to properly disinfect rubber gloves to ensure their effectiveness and prevent the spread of germs and bacteria.
In this article, we will guide you through the steps of effectively disinfecting rubber gloves.
Why Is Disinfecting Rubber Gloves Important?
Rubber gloves serve as a barrier between you and potentially harmful substances. Whether cleaning your house, working in a healthcare environment, or handling chemicals, rubber gloves protect your skin from direct contact, reducing the risk of contamination and infection.
However, gloves can collect bacteria, viruses, and other harmful pathogens. Failing to properly clean and disinfect rubber gloves can render them useless and increase the risk of cross-contamination. Therefore, disinfecting your gloves after each use is essential to maintain their effectiveness and ensure optimal protection.
Step-by-Step Guide to Disinfecting Rubber Gloves
1. Start by removing your gloves carefully. Be cautious not to touch the outside of the gloves with your bare hands to avoid transferring contaminants.
2. Use mild soap and friendly water to wash the gloves thoroughly. Pay special attention to the areas that commonly come into contact with dirt or chemicals, such as fingertips and palm areas. Gently rub the gloves together to ensure thorough cleaning.
3. Rinse the gloves under running water to remove any soap residue.
4. Now comes the actual process of disinfection. Prepare a disinfecting solution according to the manufacturer’s instructions. Various options are available, including bleach solutions, isopropyl alcohol, and commercial disinfectants. Ensure that you select a product suitable for the type of gloves you are using.
5. Immerse the gloves in the disinfecting solution and permit them to soak for the recommended period. This will ensure that any lingering germs or bacteria on the gloves are effectively eliminated.
6. When the required time has passed, remove the gloves from the solution. Rinse them under running water to remove any remaining disinfectant residue.
7. Gently squeeze the gloves to remove excess water. Avoid twisting or wringing them, which may damage the material.
8. Hang the gloves to air dry in a clean and well-ventilated area. Sidestep placing them in direct sunlight or using external heat sources, as this may cause the rubber to become brittle.
9. Once completely dry, store the gloves in clean, dry states away from direct sunlight and chemicals.
Additional Tips for Rubber Glove Disinfection
1. If your gloves become visibly soiled during use, change them immediately and clean them as soon as possible to prevent cross-contamination.
2. Avoid using strong chemical disinfectants that may degrade or damage the gloves.
3. Dispose of torn, damaged, or noticeably degraded gloves, as they may not provide adequate protection.
Disinfecting rubber gloves is crucial in maintaining their integrity and protecting yourself from contamination. By following these steps and using appropriate disinfecting solutions, you can ensure that your rubber gloves remain effective and provide the necessary barrier against harmful substances. Remember, prevention is always better than a cure, especially when it comes to personal safety and hygiene.
How to Sanitize Rubber Gloves
Rubber gloves are a crucial item in our cleaning routine, especially during these uncertain times when hygiene is of utmost importance. While rubber gloves can protect us from harmful chemicals and germs, sanitizing them properly is essential to maintain their effectiveness and ensure our safety. This article discusses easy, effective methods to sanitizing rubber gloves.
Select suitable gloves
Before diving into the sanitization process, it is essential to ensure you have the correct type of gloves. There are various types of gloves, such as latex, nitrile, and vinyl. Nitrile gloves are chosen over latex gloves because they are more chemically resistant and provide better protection.
Washing the gloves
Begin by washing your gloves thoroughly under warm water. Use a gentle dish soap or detergent to clear visible dirt, grease, or grime. Gently rub the gloves together to ensure all surfaces are adequately cleaned.
Bleach solution
For an extra level of sanitization, you can use a bleach solution. Combine 1 tablespoon of bleach with 1 quart (4 cups) of warm water. Place the gloves into the solution and soak for about 5 minutes. Afterward, rinse them thoroughly with water to remove any residual bleach.
Hydrogen peroxide
Another effective sanitizing agent is hydrogen peroxide. Fill a basin or bowl with enough hydrogen peroxide to completely submerge the gloves. Allow the gloves to soak for at least 30 minutes. Once done, rinse the gloves thoroughly with water.
UV sterilization
This can be a quick, convenient way to sanitize your gloves if you have access to a UV sterilizer. Place the gloves in the sterilizer, ensuring they are evenly distributed to allow maximum exposure to the UV light. Follow the manufacturer’s instructions for the recommended sterilization time.
Steam sterilization
Steam is an effective method to kill bacteria and germs. Hang the gloves on a clothesline or rack inside a steamy bathroom. Keep the shower hot water running to create a steamy environment. Let the gloves hang for about 20-30 minutes to ensure they are properly sanitized.
Drying the gloves
After sanitizing, it is crucial to dry the gloves thoroughly to prevent mold or bacterial growth. You can hang them in a well-ventilated area or use a drying rack. Ensure they are scorched before storing them to prevent unpleasant odors or degradation.
Proper storage
Store your rubber gloves in a clean, dry area, away from direct sunlight and heat sources. Avoid folding or compressing the gloves tightly, which can cause creases and compromise their integrity.
Remember to sanitize your rubber gloves regularly, especially if they are used in high-risk environments or come in contact with hazardous substances. Additionally, consider replacing your gloves if they are injured, torn, or worn out.
Maintaining good hygiene includes regularly sanitizing our rubber gloves. By following these simple techniques, you can ensure your gloves are clean and effective, providing the protection you need against harmful substances and germs. Stay safe, stay clean!
How to Sterilize Latex Gloves
Latex gloves are widely used in various industries, including laboratory work, food handling, and personal care. These gloves provide a protective barrier that prevents the transmission of germs, bacteria, and viruses.
Washing with Mild Soap and Warm Water
One of the simplest ways to sterilize latex gloves is to wash them with mild soap and warm water. Start by rinsing the gloves under warm running water to remove visible dirt or contaminants. Then, apply a small amount of mild liquid soap to the gloves and rub them together, ensuring that all areas are covered.
Gently scrub the gloves for at least 20 seconds. Afterward, rinse them thoroughly under warm water to remove all soap residues. Finally, air-dry the gloves in a clean area or use a lint-free towel to pat them dry.
Soaking in a Bleach Solution
Another effective method of sterilizing latex gloves is soaking them in a bleach solution. Prepare a diluted bleach solution by adding one tablespoon to one gallon of water. Ensure that the bleach contains 5.25 to 8.25% sodium hypochlorite as the active ingredient.
Submerge the gloves in the solution for at least 10 minutes. Bleach effectively kills most germs and viruses. However, it is essential to rinse the gloves thoroughly after soaking to remove any residual bleach. Hang or lay the gloves flat to air dry completely.
Using an Autoclave
An autoclave is often used to sterilize latex gloves in professional settings, such as healthcare facilities or laboratories. An autoclave is a device that utilizes pressurized steam and high temperatures to effectively kill microorganisms.
Place the gloves in an autoclave-approved bag or container and follow the manufacturer’s instructions to ensure proper sterilization.
The gloves are heated to about 250°F (121°C) for about 20 minutes. After sterilization, allow the gloves to cool before handling.
Utilizing Ultraviolet (UV) Light
UV light has excellent germicidal properties and can effectively sterilize latex gloves. Use a UV sterilizer or a UV light disinfection box specifically designed for this purpose. Place the gloves inside the device, ensuring all areas are exposed to the UV light.
Remember that the sterilization methods mentioned above apply to non-medical and non-sensitive gloves. Always check the manufacturer’s instructions and guidelines before sterilizing, as particular gloves may have specific requirements.
Maintaining proper hygiene and sterilization of latex gloves is vital, especially when keeping ourselves and others safe from harmful microorganisms has become crucial. By following these methods, you can ensure that your latex gloves remain clean and sterile, providing optimal protection for all your needs.
How to Store Reusable Gloves
Reusable gloves are a great alternative to disposable gloves as they are more cost-effective and environmentally friendly. They can be used for various tasks, such as cleaning, gardening, and handling chemicals. However, proper storage is crucial to ensure their longevity and maintain them in good condition.
Clean the gloves before storing
Before storing your reusable gloves, ensure that they are thoroughly cleaned. Follow the manufacturer’s instructions for cleaning or washing them using mild detergent and warm water. Allow the gloves to air-dry completely before storing them to prevent mold or mold growth.
Store in a calm and dry place
It is essential to store reusable gloves in a cool, dry place to prevent damage caused by heat or humidity.
Avoid storing them in areas prone to direct sunlight or high moisture levels, such as basements or bathrooms. A dry, well-ventilated storage area will help protect the gloves from deterioration and odors.
Keep gloves away from sharp objects
It is essential to avoid sharp objects that can puncture or tear the material. Store them in a dedicated container or drawer to prevent contact with sharp tools or objects that could damage them.
Use a storage bag or box
Consider using a box designed for gloves to keep them organized and protected. Look for breathable bags or boxes of fabric, mesh, or plastic. These options will allow for air circulation and prevent the development of any unpleasant odors.
Separate different types of gloves
If you have multiple pairs of reusable gloves for other purposes, it is advisable to store them in separate containers. Label or color-code the storage containers to quickly identify which gloves are suitable for specific tasks. This will save you time searching for the right pair and ensure that each pair is correctly cared for.
Avoid excessive stacking or folding
Do not excessively stack or fold your gloves, as this may cause creasing or stretching, leading to premature wear and tear. Instead, store them unfolded or loosely stacked to maintain their original shape and flexibility.
Check for damage before storing
Before storing reusable gloves, inspect them for any signs of damage, such as holes, tears, or loose seams. Damaged gloves should be repaired or replaced to ensure your safety and the effectiveness of their use. Storing damaged gloves without proper repair may result in further deterioration.
(FAQs)
Q: How often should I clean my rubber gloves?
A: Rubber gloves should be cleaned inside and out after each use. This will help remove dirt, grime, and potential contaminants from the gloves, ensuring they are sanitized and last longer. By cleaning them regularly, you will also avoid the accumulation of unpleasant odors.
Q: Can I wash my rubber gloves with water?
A: While washing your rubber gloves with water is a good start, more is needed, and more than bacteria may be required. For a more thorough cleaning, it is recommended to use mild soap or an antibacterial detergent. Ensure you thoroughly flush off the soap or detergent after washing to prevent any residue from remaining on the gloves.
Q: Can I put my rubber gloves in the washing machine?
A: Generally, it is not recommended to put rubber gloves in the washing machine. The harsh spinning and agitating motions might damage the gloves or cause them to lose shape. Instead of using mild soap and water, it is better to wash them by hand.
Q: How do I clean the inside of my rubber gloves?
A: Cleaning the inside of rubber gloves is equally essential to maintain proper hygiene. To do this, mix warm water with mild soap or detergent.
Then, turn the gloves inside out and submerge them in the soapy water. Gently rub the inside surface to remove any dirt or bacteria. Thoroughly flush the gloves with clean water and allow them to air dry.
Q: Can I use bleach to cleanse my rubber gloves?
A: It is usually advised to avoid using bleach on rubber gloves. While bleach effectively kills germs and bacteria, it can also weaken rubber, causing it to deteriorate over time. Instead, use mild soap or antibacterial detergent to clean your gloves effectively without compromising quality.
Q: How should I keep my rubber gloves after cleaning?
A: After cleaning your rubber gloves, it is essential to store them properly to avoid mildew growth and prolong their lifespan. Permit the gloves to air dry completely before folding or storing them.
Keeping them in a clean, dry place, away from direct sunlight, heat, and moisture, is best. Tucking them neatly and placing them in a drawer or hanging them on a hook will help maintain their shape.
Conclusion
Rubber gloves are essential for many tasks. Whether you are doing household chores, handling chemicals, or working in the medical field, rubber gloves provide protection against contamination and skin irritation.
Rubber gloves must be cleaned and maintained correctly, like any other cleaning tool, to ensure longevity and effectiveness. This article will discuss cleaning rubber gloves and provide valuable tips and tricks to keep them in good condition.
Cleaning rubber gloves is essential to remove any dirt, grime, or chemicals that may accumulate on the exterior and control the growth of bacteria and fungi. Failing to clean them regularly can compromise their protective properties and pose serious health risks. Therefore, following a proper cleaning routine for your rubber gloves is crucial.
Cleaning your rubber gloves regularly is not only about hygiene but also about maintaining their functionality and durability.
#CleanGloves #GloveCare #RubberGloveHacks #FreshAndClean #GloveLife #HouseholdHacks #DIYCleaning #SqueakyClean #GloveGoals #EcoFriendlyCleaning #HomeHacks #CleaningTips #RubberRevival #StayFresh #GloveCleaning101 #SparklingGloves #CleanWithMe #HomeCleaning #GloveLove #CleaningRoutine #MessyToClean #GloveGameStrong #ShinyAndNew #ChoresMadeEasy #CleanAndGreen #GloveMaintenance #GoodbyeGerms #CleaningInspo #GloveRefresh #HappyCleaning #CleanVibesOnly