Wearing a helmet is one of the most effective ways to protect your head during various activities such as biking, motorcycling, or sports. However, the effectiveness of a helmet largely depends on its fit.
A helmet that’s too loose may shift during impact, failing to provide adequate protection, while one that’s too tight can cause discomfort and distractions, potentially leading to accidents. Therefore, proper helmet sizing is critical for both safety and comfort.
Proper sizing ensures the helmet stays securely on your head and absorbs and distributes impact forces correctly, reducing the risk of injury. In addition, maximizing comfort encourages consistent helmet use, which is vital for sustained protection. Without the right fit, even the best helmet design cannot guarantee safety.
Understanding how to measure your head accurately is the first step toward selecting the right helmet size. This knowledge empowers individuals to make informed purchases, whether buying online or in-store, ensuring they aren’t left guessing or relying on ill-fitting helmets.
For more information on head safety and proper helmet use, the National Highway Traffic Safety Administration (NHTSA) provides extensive guidelines and resources.
The Snell Memorial Foundation provides certification details to help consumers choose helmets that meet safety standards. To explore helmet safety and fit details, visiting reputable sites such as the Bicycle Helmet Safety Institute is highly recommended.
How to Measure Your Head for a Helmet
Measuring your head for a helmet is a simple yet precise process that guarantees the perfect fit. It involves accurately measuring your head circumference using the right tools and techniques. Having this measurement helps you consult helmet size charts effectively and avoid costly returns or unsafe fits.
The process begins by gathering the necessary materials, including a flexible measuring tape for body measurements. It’s important to position the tape correctly around your head, typically just above your eyebrows and ears, encompassing the largest part of the skull. Accuracy here is key; loose or overly tight tape can mislead you about the required size.
When measuring, standing in front of a mirror or having a friend help can improve precision. Record the measurement to the nearest millimeter or fraction of an inch. This figure serves as your reference when shopping for helmets across different brands, as sizing may vary slightly.
In addition to the basic procedure, note that helmet types (bike, motorcycle, climbing) may have unique fit requirements, so supplementary adjustments may be needed after measurement. Commit to rechecking measurements periodically, as head size can change during growth phases or weight fluctuations.
For a deeper dive, visit safetygearpro.com for detailed guides and videos on helmet fitting, and explore helmet model reviews at helmetreviews.com to compare sizing standards.
Overview of Tools Needed for Measuring Your Head
Accurate head measurement requires appropriate tools and accessories. Here are the key tools you need, detailed in two paragraphs for clarity.
Flexible Measuring Tape: The primary tool for head measurement is a soft, flexible tape measure, typically made of fiberglass or plastic. Unlike rigid tapes, flexible tapes conform to the curves of your head, giving a precise circumference reading. It should be marked in both metric (centimeters) and imperial (inches) units for versatility. Many tailors’ tapes are suitable, but specialized helmet-fitting tapes might provide added grip to prevent slipping during measurement.
Mirror or Helper: While a measuring tape improves accuracy, a mirror or an assistant helps ensure the tape is placed correctly and evenly around the head. This step ensures that the tape doesn’t tilt forward or backwards, which can cause erroneous results. A helper can also improve comfort during the process and verify that the tape is snug but not too tight.
Marker or Indicator: In some cases, especially when measuring multiple people or double-checking sizes, a residual mark on the tape or skin can help confirm the exact measurement location. This can be done with a washable marker or by noting the point where the tape overlaps.
Note-taking Tool: Record the measurement accurately. Whether using a phone, notebook, or helmet-sizing app, documenting the result ensures you don’t forget or misremember your size when browsing helmets. Some apps even store head shapes and sizes for comparison across brands.
Applying these tools appropriately ensures you obtain precise measurement data you can use with confidence to find the perfect helmet fit.
Step-by-Step Instructions for Measuring Head Circumference
| Step Number | Instruction | Details and Tips | Common Mistakes to Avoid |
|---|---|---|---|
| 1 | Gather Tools | Use a flexible measuring tape, a mirror or helper, and note-taking materials. Ensure the tape is not stretched or damaged. | Using a rigid tape or making the tape too tight affects accuracy. |
| 2 | Position the Tape | Place the tape about an inch above your eyebrows, across the middle of your forehead, over your ears, and around the biggest part of your head at the back. | Measuring too low on the forehead or too far back can result in an incorrect size. |
| 3 | Align and Level the Tape | Check in the mirror or have your helper confirm that the tape is level all around the head. The tape should sit evenly and lie flat without twisting. | Allowing tape to tilt or twist may lead to inconsistent sizing. |
| 4 | Measure Snugly, Not Tight | Bring the tape snugly around your head so it is firm but not too tight. Breath normally; do not hold your head up or down unnaturally. | Measuring with the tape loose or overly tight will produce inaccurate results. |
| 5 | Read the Measurement | Record the size at which the tape overlaps its start. Use metric sizes for most helmet charts (typically in centimeters). | Reading the wrong point on tape or writing down the wrong number causes fitting errors. |
| 6 | Double Check | Repeat the measurement two or three times to ensure consistency. Take the average if minor differences appear. | Relying on a single measurement increases the risk of error; always verify. |
| 7 | Consult Helmet Size Charts | Use your measurement to determine the correct helmet size using brand-specific charts, as sizing can vary. | Ignoring brand differences or mixing sizes from different charts can lead to an incorrect fit. |
| 8 | Try Helmet On | After measuring, try on helmets to confirm the fit is secure, comfortable, and stable, with no pressure points. | Skipping the test-fit after measurement may cause discomfort if the helmet shape differs. |
This structured table guides you through measuring your head circumference step by step, ensuring an accurate, reliable result that directly contributes to helmet safety and comfort.
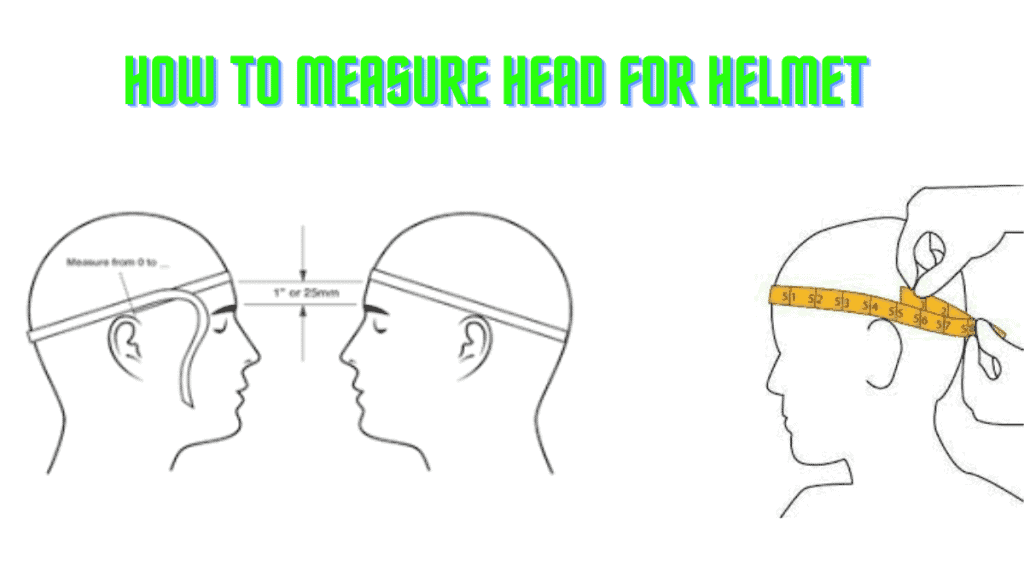
How to Find the Right Position for Measuring Your Head
Finding the right position for measuring your head is essential for an accurate helmet size determination. The measuring tape should be positioned about one inch (2.5 cm) above your eyebrows, passing just above the ears and circling around the largest part of the back of your head. This area often corresponds to the widest part of your skull, ensuring the helmet will comfortably accommodate the most critical points.
When placing the tape, stand straight with your head level—not tilted up or down—to avoid skewing the measurement. If possible, use a mirror or ask someone to help you position the tape evenly, as it’s difficult to verify tape alignment on your own. The tape must sit level all around your head, not angled or slipping down toward your neck or forehead.
Do not pull the tape too tightly, as this can compress your scalp and result in a falsely small measurement. Conversely, a loose tape measure will overestimate your size, resulting in a helmet that is too big and unsafe. Aim for a snug fit that feels comfortable but does not pinch.
Correct positioning also takes into account hair volume and style; bulky hairstyles may require careful consideration to avoid helmet fit issues. Always measure with your usual hairstyle to ensure a consistent fit during use.
Tips for Using a Flexible Measuring Tape Correctly
Using a flexible measuring tape correctly is vital to ensure accurate head measurements. First, check that the tape is untwisted and lies flat against your head during measurement; any bends or twists can shorten the length reading.
Ensure the tape is not stretched beyond its natural length, as this can cause an erroneously larger measurement. The tape should follow the natural curve of your head without gaps or pressure points.
When wrapping the tape, begin at forehead level, just above your eyebrows, and wrap it around, keeping the tape horizontal. Read the measurement at the point where the tape’s end meets the remaining length. Ideally, take the measurement twice for consistency.
Store your measuring tape in a safe place to prevent damage and wear, which can affect accuracy over time. If you don’t have a flexible tape measure, you can substitute a string or ribbon and measure the length with a ruler, but a proper flexible tape measure is highly recommended for precision.
Explanation of Helmet Size Charts and How to Read Them
Helmet size charts are guides that correlate head circumference measurements with corresponding helmet sizes. These charts vary by manufacturer because helmet designs and sizing standards differ. They usually list measurements in centimeters or inches and match them to size categories such as Small, Medium, Large, or numerical sizes.
To read a helmet size chart, locate your head circumference value and find the size category it falls within. For example, a head circumference of 58 cm might correspond to a Medium or size “M” in one brand, but a Large or “L” in another. Always use the chart specific to the brand and helmet model you plan to purchase.
Many charts also include the helmet’s internal dimensions, which help ensure the helmet fits your head shape and volume. Some brands provide additional sizing tools or fit systems to accommodate variability.
When shopping, consult multiple charts if you’re considering different brands to find the closest size. Avoid guessing sizes based on generic labels, as this can cause discomfort and reduce protection.
Common Mistakes to Avoid When Measuring
Several pitfalls can compromise the accuracy of your head measurement. Avoid measuring over thick hats, bulky hairstyles, or accessories that add bulk to your head. For the most accurate measurement, take it with your hair as you’ll wear it under the helmet.
Another common mistake is placing the measuring tape too high on the head or too low on the forehead. Remember, the tape should be about one inch above the eyebrows, resting evenly across your forehead, and the largest circumference at the back.
Tightening the tape too much can compress your scalp and result in a helmet size smaller than your actual head circumference, while leaving it too loose can lead to oversized helmet purchases.
Skipping double-checking measurements or ignoring brand-specific helmet sizing charts can lead to an incorrect size selection. Finally, not physically testing the helmet fit after measurement can result in a helmet that feels uncomfortable or unstable, undermining the purpose of accurate measurement.
How to Ensure a Proper Fit After Measuring
Once you have your head circumference and helmet size, ensuring a proper fit requires trying on the helmet. Place the helmet on your head and fasten the straps securely. The helmet should feel snug but not painfully tight—there should be no excessive pressure points.
Check that the helmet does not tilt forward or backwards easily, indicating a loose fit. Shake your head side to side; the helmet should move very little if properly fitted.
Make sure the helmet sits level on your head, not tilted back, exposing your forehead, or tilted forward, obstructing your vision. The padding inside should contact your head evenly.
Adjust the chin strap to a tight enough fit that the helmet stays in place, but comfortable enough to allow jaw movement and speaking.
If the helmet offers adjustable fit systems (dial-fit, straps), use them to fine-tune the comfort and stability.
Never compromise on comfort or fit—an ill-fitting helmet might be neglected or offer reduced protection during impact.
Frequently Asked Questions (FAQs)
Q1: Can I use a regular tape measure instead of a flexible one?
A1: It’s best to use a flexible measuring tape specifically made for body measurements because it can contour around the head easily, providing accurate circumference readings. A rigid tape or metal measuring tape may not give reliable results.
Q2: Should I remove my hair or hairstyle before measuring?
A2: Measure your head as you usually wear your hair under the helmet. Bulky hairstyles can affect fit, so it’s important to consider this when measuring.
Q3: How often should I measure my head for a helmet?
A3: For adults, head size rarely changes significantly. However, if you are buying helmets for children, measure them regularly as they grow.
Q4: What if I’m between sizes on a helmet chart?
A4: When between sizes, choosing the smaller size for a snug fit is generally safer, though this may vary by helmet design and padding thickness.
Q5: Can head shape impact helmet fit beyond size?
A5: Yes, head shape (round, oval, intermediate) influences helmet comfort and fit. Some brands cater to specific shapes, so trying helmets on is advisable.
Conclusion
Proper helmet sizing is critical to safety and comfort. Measuring your head accurately with the right tools and following structured steps helps ensure you select a helmet that fits securely, provides optimal protection, and is comfortable to wear. Avoiding common mistakes and understanding helmet size charts across different brands further improves your chances of finding the perfect fit.
Taking the time to learn these procedures is an investment in your safety. Whether you’re cycling, motorcycling, or engaging in any activity that requires head protection, a well-fitted helmet can significantly reduce the risk of injury. Remember, a helmet’s protective capability is only as good as how well it fits and is worn.
Stay informed, retake measurements if your head size changes, and always try on helmets whenever possible to ensure the best fit. Your head—and safety—are worth it.
#HelmetSafety #ProperHelmetFit #HeadMeasurement #SafetyGear #HelmetSizing #BicycleSafety #MotorcycleHelmets #ProtectYourHead #HelmetFitTips #SafetyFirst