The Milwaukee headlamp is a high-performance lighting solution tailored specifically for professionals who operate in challenging, low-light environments such as construction sites, industrial worksites, and maintenance tasks. Known for its durability, sleek design, and advanced LED technology, the Milwaukee headlamp delivers powerful illumination with multiple brightness settings, long runtime, and rugged water and dust resistance.
Its lightweight and ergonomic profile ensures comfortable extended use, while specialized mounting options enable seamless attachment to hard hats, enhancing both safety and productivity.
Beyond luminosity, Milwaukee headlamps integrate user-focused features including adjustable beam angles, rechargeable batteries, and compatibility with various safety gear. The REDLITHIUM USB Hard Hat Headlamp, for example, provides up to 475 lumens with five output modes and a pivoting head for precise light direction.
Its secure mounting system and dust-resistant housing are engineered for demanding job sites, making the Milwaukee headlamp an indispensable accessory for any safety-conscious professional.
This in-depth guide explains how to securely and correctly attach a Milwaukee headlamp to a hard hat, ensuring optimal lighting and comfort. It covers component overview, step-by-step setup, adjustment tips, and maintenance recommendations to assure dependable performance in all working conditions.
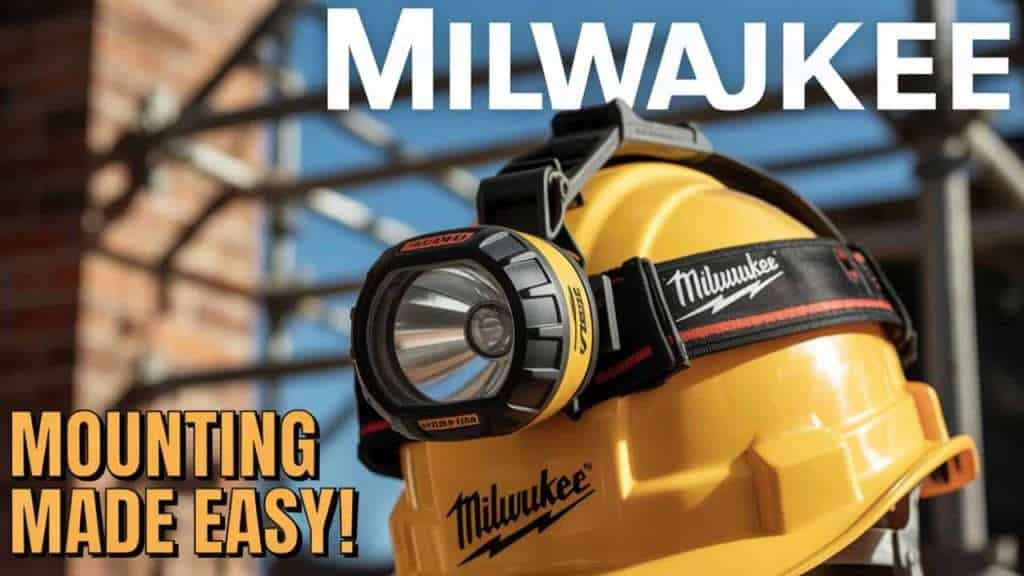
How to Attach Milwaukee Headlamp to Hard Hat
Attaching a Milwaukee headlamp to a hard hat is a straightforward process designed to maximize both safety and functionality. The first step involves selecting a Milwaukee headlamp model that is compatible with your hard hat, often featuring integrated mounting clips or a versatile strap system specifically engineered for hard hat compatibility. Ensure the hard hat is clean and free from damage before beginning.
The Milwaukee headlamp mount typically clips onto a designated slot or edge on the front of the hard hat, providing a secure hold that withstands movement and vibrations common on job sites. The headlamp’s mounting clips or included accessory webbing facilitate fast installation without requiring special tools. Once mounted, the headlamp should be adjusted to fit snugly against the hard hat’s contour to prevent slippage.
Additionally, many Milwaukee headlamps come with an adjustable pivoting light head, allowing users to direct illumination precisely where needed without having to move their entire head. This feature enhances work efficiency and reduces the need for repositioning. Following the manufacturer’s instructions for mounting and adjustment, if available, is important for ensuring the safety certifications of both the hard hat and headlamp remain intact.
For further technical support or visual step-by-step assembly videos, Milwaukee’s official website and authorized distributors provide extensive resources. This ensures users can confidently secure their Milwaukee headlamp on hard hats, optimizing workplace visibility and safety.
Overview of Hard Hats and Safety Gear Compatibility
Hard Hats Designed for Accessory Integration
Many modern hard hats, especially those from well-known manufacturers such as 3M, MSA, and Milwaukee, feature built-in slots or rails specifically designed to accommodate accessories like face shields, earmuffs, and headlamps.
These features enable secure attachment without compromising the structural safety of the helmet. Milwaukee hard hats integrate seamlessly with Milwaukee BOLT headlamp mounts designed for easy clipping and secure fit, minimizing wobble and ensuring stable lighting.
Compatibility Considerations and Safety Compliance
Not all headlamps are compatible with all hard hats; compatibility depends on the helmet design, mounting points, and accessory shape. Hard hats compliant with ANSI/ISEA Z89.1 provide guidance on integrating accessories safely to prevent compromising protective capabilities.
Milwaukee offers dedicated headlamp mounts, such as the BOLT Reversible Hard Hat Headlamp Mount, that connect securely to their hard hats, maintaining full certification and worker protection. Using unauthorized mounts or improperly attached gear risks safety failure and invalidation of certification, making it crucial to verify compatibility before attachment.
Step 1: Gather Your Milwaukee Headlamp and Hard Hat
| Item Number | Component/Item | Description | Notes and Tips |
|---|---|---|---|
| 1 | Milwaukee Headlamp | REDLITHIUM USB Hard Hat Headlamp or compatible Milwaukee BOLT model headlamp | Ensure battery is fully charged or fresh batteries are installed |
| 2 | Hard Hat | Milwaukee BOLT or compatible hard hat model with mounting slots or a suitable surface for mounting | Confirm that the hard hat is clean, damage-free, and ANSI compliant |
| 3 | Headlamp Mount | Milwaukee BOLT Hard Hat Headlamp Mount (model 48-73-1090) or included mounting clips/webbing | Verify all mounting hardware is present and undamaged |
| 4 | Mounting Clips or Webbing | Plastic clips or adjustable webbing straps are designed to attach the headlamp securely to the hard hat | Arrange mounting accessories for easy access |
| 5 | Cleaning Supplies | Soft cloth, mild soap, water | Clean surfaces to ensure secure attachment |
| 6 | Workspace | Flat, well-lit area | Prevent loss of small parts and ease handling |
| 7 | User Manual or Guide | Milwaukee headlamp and hard hat instruction manuals | Refer to model-specific notes |
| 8 | Optional Tools | Small screwdriver or pliers (rarely needed but helpful if tightening or adjusting mounts) | Keep handy for fine adjustments |
| 9 | Safety Gloves | Protective gloves | Optional but recommended for handling gear on active sites |
| 10 | Storage Case | For safely storing a headlamp or a hard hat when not in use | Prevents damage or dirt accumulation |
Step 2: Locate the Attachment Points on the Headlamp
To attach your Milwaukee headlamp to a hard hat, first identify the mounting features of the headlamp itself. Most Milwaukee headlamps designed for hard hat use come with integrated clips on the sides or backside of the lamp housing. These clips are specifically engineered to snap onto mounting points on compatible hard hats or mounting brackets.
Some models utilize flexible rubber grips or an adjustable strap system to secure the light, accommodating various shell shapes. Locate the clip openings or the webbing slot near the base or back of the headlamp. These points are reinforced for durability, ensuring the lamp remains firmly in place during rigorous physical movements.
It is essential to familiarize yourself with these attachment points and verify that the headlamp’s orientation aligns with the hard hat design for optimal balance and safety. Reading the headlamp user guide can provide additional insight into clip mechanics, lock features, and safe attachment practices recommended by Milwaukee.
Step 3: Prepare the Hard Hat for Attachment
Before mounting the headlamp, prepare the hard hat to ensure maximum stability and safety:
1. Clean the hard hat’s mounting surface with mild soap and a soft cloth to remove dust, oils, or debris that could reduce adhesion or clip stability.
2. Inspect the mounting slots or edges for damage or deformities that could impair clip engagement.
3. For Milwaukee BOLT hard hats, identify the reversible mounting points located at the front and back edges of the helmet; these allow flexible headlamp placement options.
4. Remove any interfering headwear accessories, such as sweatbands or face shields, that might block the mounting area.
5. Confirm the hard hat is dry and the interior suspension is adjusted for proper fit — a secure helmet prevents unwanted shifting of the attached headlamp.
6. If your headlamp uses webbing instead of clips, pre-thread the strap to facilitate smooth installation onto the helmet.
Proper preparation prevents damage to both the headlamp and hard hat, ensuring a firm and balanced attachment.
Step 4: Align the Headlamp with the Hard Hat’s Front Edge
The next step involves positioning the Milwaukee headlamp correctly for maximum performance and comfort. Align the emission lens of the headlamp so it points outward from the front brim edge of the hard hat.
Ensure the light head does not obstruct the wearer’s visibility or movement while providing sufficient forward illumination. Placement near the middle front area provides the best balance, allowing the headlamp to pivot naturally with head movement.
For reversible mounting systems like Milwaukee’s BOLT mount, you can also attach to the rear brim if required by specific work conditions or to reduce glare for others nearby.
Correct alignment enhances light coverage, reduces neck strain, and guarantees the headlamp complements rather than hinders the hard hat’s safety function.
Step 5: Securely Attach the Headlamp Using the Mounting Clips
Attach the headlamp by gently but firmly clipping it onto the hard hat’s mounting point. Press the clips or the webbing mount against the helmet surface until you hear or feel a “click,” indicating a secure lock.
Double-check that both clip sides are fully engaged. The detent mechanism in Milwaukee’s BOLT mounts secures the light to prevent accidental detachment even during intense movement.
For webbing mounts, ensure the strap is tight and lies flush against the helmet without sagging. Tuck any loose strap ends to avoid snagging hazards.
Never force the mounting clips; rather, use natural snap points to maintain the integrity of clips and slots. Loose attachment risks loss of lighting and potential hazards on the job.
Step 6: Adjust the Angle of the Headlamp for Optimal Lighting
After the headlamp is firmly attached, adjust its angle to illuminate exactly where work requires. Milwaukee headlamps generally feature a pivoting light head with several locking positions.
Tilting the beam downward focuses light on close tasks such as wiring or cutting, while a more horizontal projection illuminates the broader workspace. Adjust as needed throughout the workday based on operational needs.
The pivot also reduces glare to others, providing safer shared working conditions. Make minor angle adjustments with your hand to avoid disrupting attachment stability.
Proper light direction enhances productivity, reduces eye strain, and increases overall safety.
Tips for Ensuring a Secure and Safe Installation
1. Always verify both headlamp and hard hat models are compatible by consulting manufacturer guides.
2. Clean both attachment points to maximize grip and clip reliability.
3. Use only genuine Milwaukee mounting accessories designed for your headlamp and hard hat series.
4. Test the assembly by shaking your head gently; the headlamp should not shift or loosen.
5. Avoid modifying clips or mounts that could compromise the locking mechanism or certification.
6. Regularly inspect the mount and lamp connection throughout use, especially after impacts or removal.
7. Store your headlamp and hard hat separately when not in use to avoid deformation of clips or straps.
8. When working in extreme conditions, double-check that the installation remains stable to prevent operational hazards.
9. Use the adjustable ratchet or suspension system of your hard hat to maintain helmet stability, supporting the headlamp securely.
(FAQs)
Q1: Which Milwaukee headlamps are compatible with hard hats?
A. Most Milwaukee REDLITHIUM USB Hard Hat Headlamps and BOLT headlamps are compatible with Milwaukee BOLT hard hats and other helmets equipped with compatible mounting slots or clips.
Q2: Can I attach a Milwaukee headlamp to any brand of hard hat?
A. Milwaukee headlamps are optimized for Milwaukee BOLT hard hats, although some mounts might work with other brands if slot sizes and shapes are compatible. Confirm compatibility before installation.
Q3: How secure is a Milwaukee headlamp once mounted on a hard hat?
A. When installed correctly with the BOLT mount or official clips, the headlamp offers a very secure connection that resists movement, vibration, and accidental detachment during typical work activities.
Q4: Do I need tools to attach the Milwaukee headlamp to a hard hat?
A. No special tools are required. The headlamp typically uses clips or webbing that snap or strap onto designated mounting points for easy, tool-free installation.
Q5: How do I clean and maintain the Milwaukee headlamp and mount?
A. Use mild soap and water to clean both the headlamp and mounting clips. Avoid harsh solvents. Regularly inspect for stress or wear and replace damaged mounts promptly.
Conclusion
Attaching a Milwaukee headlamp to a hard hat combines essential lighting with reliable head protection, enhancing safety and productivity on all job sites. By gathering the correct equipment, identifying secure attachment points, preparing both the headlamp and hard hat, and following a precise, step-by-step assembly process, users ensure a stable and comfortable fit with optimal illumination.
Milwaukee’s innovative BOLT mounting system and robust headlamp design offer professionals a durable solution tested for workplace endurance. Adjusting the angle to meet task-specific needs and following maintenance best practices ensures long-term, dependable usage.
Leveraging official Milwaukee resources and compatible accessories maximizes device lifespan and preserves the integrity of ANSI certification. Correct installation reduces hazards related to lighting failures or headlamp displacement, while supporting safer and more efficient work environments daily.
#MilwaukeeHeadlamp #HardHatLighting #JobsiteSafety #PPE #WorkplaceSafety #ConstructionGear #HeadlampMount #MilwaukeeTools #IndustrialLighting #SafetyEquipment


