Drawing a football helmet is an engaging and creative project that appeals to fans, students, and artists alike. A football helmet is not just a symbol of sport but also a complex piece of equipment with distinctive shapes, details, and personality that reflect team spirit and player protection.
Mastering the art of drawing a football helmet can be both enjoyable and rewarding, as it provides foundational skills for illustrating sports gear and understanding volume, perspective, and detail in art.
The importance of capturing accurate shapes, such as the rounded shell, the protective face guard, and the cushioned chin strap, is key to creating a realistic and visually appealing helmet drawing.
Adding team logos, decals, shading, and highlights further enhances the drawing’s dimension and vibrancy. Whether you are sketching for enjoyment, artistic practice, or educational purposes, producing a quality football helmet artwork sharpens observation, patience, and technical skill.
This detailed guide on “How do you draw a football helmet” offers step-by-step instructions, from material preparation to final touches. Readers will find helpful insights into creating basic outlines, incorporating intricate design elements, and applying shading techniques for lifelike depth. The tutorial also provides tips and FAQs that address common challenges and boost drawing confidence, making it suitable for both beginners and advanced artists.
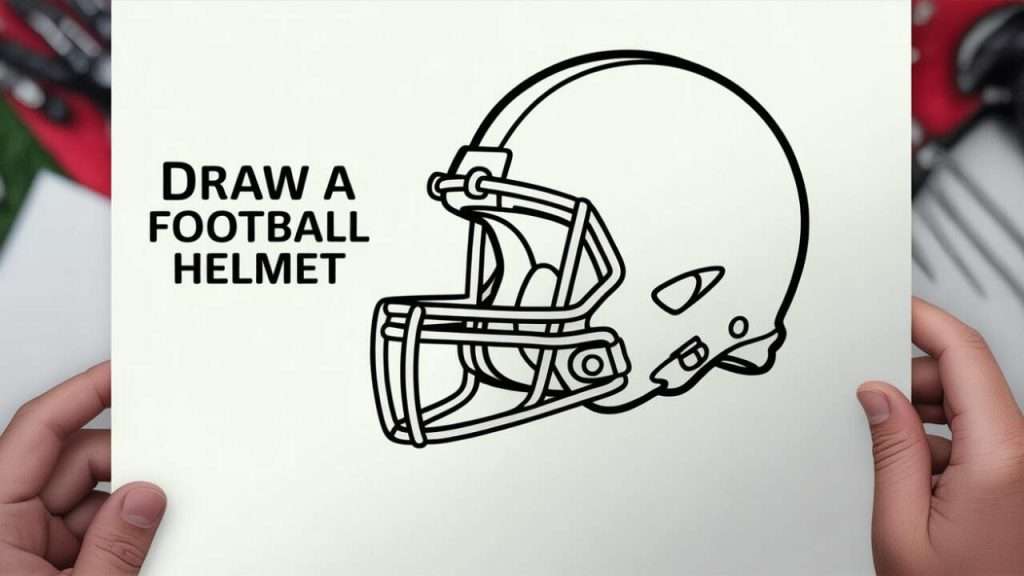
How Do You Draw a Football Helmet
Drawing a football helmet starts with envisioning its fundamental shape: a rounded, slightly elongated shell designed to fit snugly around a player’s head. First, focus on sketching the basic outline that defines this volume—usually a large “C” or oval shape indicating the shell’s contour. This initial step establishes the helmet’s proportions and guides all subsequent details.
Next, add elements like the face guard, which consists of metal bars protecting the face. Begin by drawing curved lines that extend from the front of the shell, creating the web-like structure of the mask. It is important to maintain balance and spacing, as the face guard’s geometry significantly impacts the helmet’s identity and realism.
Afterwards, include the chin strap attachment, small rivets, vents, and any other hardware typically seen on helmets. These fine details provide complexity and authenticity to your drawing. Finally, consider positioning and sizing the team logo or personalized decals on the helmet’s side, which often serve as focal points and add character.
Throughout the process, use layered pencil strokes to build and refine shapes, starting light to allow for corrections and gradually darkening your lines. To conclude, enhance your drawing by shading areas to convey depth and curvature, highlighting edges, and capturing reflections of light on the helmet’s surface.
By following this structured approach, creating a convincing football helmet drawing becomes a manageable and rewarding experience.
Gathering Materials Needed for Drawing
To start drawing a football helmet, assemble quality materials that facilitate control, precision, and finishing flourishes. Essential items include good-quality drawing paper, such as smooth sketch pads or heavyweight artist sheets, suitable for pencil and ink work. Choose pencils of various hardness grades: HB or 2B for basic sketching, 4B or 6B for shading and darker lines, and mechanical pencils for details.
Additional supplies enhance the drawing process. An eraser—preferably a kneaded one—allows subtle corrections and highlights. Fine-tipped black markers or pens help outline and define final lines crisply. For colourists, colored pencils, markers, or watercolours enable adding vibrant hues to team logos and helmet designs.
A ruler helps draw straight lines for the face guard structure, while a blending stump or cotton swab smooths shading transitions. Having these tools organized and easily accessible encourages a smooth workflow and creative freedom.
Creating the Basic Shapes and Outline
| Step Number | Task Description | Detailed Instructions | Important Tips |
|---|---|---|---|
| 1 | Draw the Main Helmet Shape | Sketch a large “C” or oval to form the main shell of the helmet, encompassing the overall helmet volume | Use light strokes; this is your drawing guide |
| 2 | Add the Back and Bottom Elements | Attach a triangular or trapezoidal shape on the bottom left for the back-bottom part of the helmet | This anchors the helmet’s form and adds dimension |
| 3 | Outline the Front Opening | Draw a curved cut-out on the right representing the face guard’s base opening for the player’s face | Keep this proportionate to the helmet shape |
| 4 | Connect Main Shapes | Use long curved lines to join the back shape with the front opening, smoothing transitions | These lines define the smooth helmet contour |
| 5 | Sketch the Face Guard Foundation | Draw guidelines for the face guard bars extending from the front opening—focus on placement and spacing | Use a ruler if necessary to maintain straight bars |
| 6 | Block in Chin Strap Base | Add small circles or oval shapes near the lower helmet edges to indicate chin strap snaps or connectors | Keep the size modest for accurate representation |
| 7 | Lightly Indicate Venting or Rivets | Sketch small dotted or circular texture marks suggesting vents or snaps on the shell | Details add realism, but keep it light at this stage |
| 8 | Review Proportions and Adjust | Check balance and symmetry; correct shapes and lines before proceeding | Step back from the drawing periodically to assess the overall look |
| 9 | Erase Overlapping Guidelines | Clean unnecessary sketch lines for clarity | Helps prepare for detailed work and final outlining |
| 10 | Finalize Outline with Darker Lines | Reinforce main contours, ensuring smooth, confident strokes | Use markers or dark pencils for crisp definition |
This stepwise approach with clear connections among shapes forms a strong foundation for detailed refinement and shading.
Adding Details to the Helmet’s Design
Once the basic outline is complete, it’s time to enrich the drawing with detailed design elements. This includes defining the shell’s ridges and textures that mimic the appearance of real helmet materials. Add bolt heads or fastening snaps to the attachment points, and detail ventilation slits to enhance the helmet’s functionality and appearance.
Pay special attention to the face guard’s bars, adding dimension by varying thickness and perspective. Include subtle shadowing along the bars to separate them visually from the shell. For a realistic effect, incorporate creases or slight indentations on the helmet’s surface that suggest use or design contours.
Adding reflective highlights or light scratches can give the impression of polished metal or plastic. When detailing, focus on balance—avoid overcrowding, which can clutter the illustration. Maintain consistent line weight and ensure that details complement the helmet’s form rather than confusing it.
Incorporating Face Guard and Chin Strap Elements
The face guard is a critical and distinctive feature of a football helmet. Sketch it by drawing pairs of parallel or slightly curved bars running horizontally and vertically to form a protective grid. Use ruler-guided lines for accuracy in spacing, but allow slight variations to follow the helmet’s round contours.
The chin strap typically connects near the lower sides of the helmet. Draw narrow, flexible bands attaching to small snap points, curving naturally to suggest strap material. Detailing buckles, adjustable clasps, or padding enhances realism and visual interest.
Ensure these elements align properly with the helmet shell and do not obscure other design parts. Use shading to create a clear separation between the foreground (face guard and strap) and the background (helmet shell), establishing spatial clarity in the final drawing.
Adding Team Logos or Decals
Customizing the helmet with team logos or decals adds personality and context to the drawing. Sketch the logo lightly in the desired position, most commonly on the sides or back of the helmet. Pay close attention to the details, shapes, and proportions of the logo for authenticity.
If recreating a real team logo, research images to capture angles and color placement accurately. For original designs, be creative but ensure the logo integrates seamlessly with the helmet’s form and curvature.
Once confident, darken the outline of the logo and add shading or color to match. Gradually layer colors when using pencils or markers to achieve a smooth fill and vibrant effects. Logos often serves as a focal point, so take care to make it crisp and visually balanced.
Adding decals or stickers, such as stripes or number marks, can further enhance the look, providing a race-ready or personalized appearance.
Shading and Adding Depth for a 3D Effect
Shading transforms your flat outline into a three-dimensional illusion. Begin by identifying the light source direction. Shadows appear opposite the light, while highlights lie on surfaces facing the light source.
Use gradual tonal variations to define the roundness of the helmet shell. Darken the underside edges and areas beneath the face guard bars to create a sense of spatial separation. Shade around ventilation slits and bolt heads for realism.
Cross-hatching, blending with tortillons or stumps, and layering with pencils are effective shading techniques. For sharper highlights, erase small areas gently or use a white pencil.
Consistent shading lends volume and weight to the drawing, enhancing believability and artistic appeal.
Final Touches and Highlights
After shading, apply final touches that polish your drawing. Revisit outlines that may have faded and reinforce with fine liners for crisp definition. Add small highlights or gleams on shiny surfaces to simulate light reflection, especially on curves or metallic parts.
Check for any stray marks, smudges, or uneven shading areas and correct them delicately. Add texture to leather-like chin strap surfaces or mesh under the face guard as appropriate.
Consider adding a faint shadow beneath the helmet to ground it visually. Sign your work and, if desired, color the drawing digitally or with traditional media for vivid presentation.
Review and Tips for Improving Your Helmet Drawing
Regularly step back and evaluate your progress to spot proportions or alignment issues early. Use mirrors or flip your drawing upside down for a fresh perspective. Practice drawing individual elements, like the face guard or logos, separately to build confidence.
Seek feedback from peers or art communities. Experiment with different shading styles to find the one that best conveys the helmet’s shape. Use references liberally—such as photos, videos, or real helmets—to understand form and detail.
Patience and repetition are key—each drawing enhances skill. Don’t rush; take breaks to keep your vision fresh.
(FAQs)
Q1: What’s the easiest way to start drawing a football helmet?
A. Start with simple shapes like a large “C” for the shell, then build out the base and face guard gradually.
Q2: Can beginners draw a realistic football helmet?
A. Yes, by breaking down into steps focusing on shapes, details, and shading, beginners can achieve impressive results.
Q3: What materials work best for drawing helmets?
A. Pencils in various hardness, fine liners, and blending tools for shading. For color, colored pencils or markers are ideal.
Q4: How do I draw the face guard accurately?
A. Use straight or slightly curved lines spaced consistently, using rulers and guidelines for precision.
Q5: Can I add my own logo or decoration?
A. Absolutely; personalizing drawings with logos or decals enhances creativity and uniqueness.
Conclusion
Drawing a football helmet combines technical skill with creativity, producing an artwork that celebrates the iconic nature of the sport’s protective gear. By following a structured approach—from gathering materials and sketching basic shapes to refining details, adding logos, and perfecting shading—you create compelling and lifelike helmet illustrations.
Mastering such drawings enhances broader artistic capabilities, including observation, perspective, and attention to detail applicable across numerous subjects. Whether for personal enjoyment, education, or professional portfolios, well-rendered football helmets captivate both artist and viewer.
#HowToDrawFootballHelmet #FootballHelmetDrawing #SportsArt #DrawingTutorial #FootballArt #HelmetSketch #DrawingTips #ArtForBeginners #SketchingFootballGear #CreativeDrawing


