Seeking a basic way to keep your little explorer out of harm’s way? A well‑designed security entrance can be one of the most reliable devices for safeguarding curious infants from stairways, cooking areas, and other dangerous areas in your house. Yet numerous parents struggle to find a gate that actually fits their space, feels sturdy, and doesn’t clash with their decor.
That’s why a growing number of caregivers are choosing to take control and create a baby entrance that meets their specific needs. When you recognize the crucial safety features, the appropriate materials, and how to secure whatever you’re mounting, you can have far more confidence whenever your child crawls or waddles toward a “no-go” area.
Before getting a single tool or purchasing any materials, it’s important to understand what makes an entrance truly secure, resilient, and baby‑proof.
In the following sections, you’ll find everything you need to plan and build a gateway that helps safeguard your child and gives you genuine peace of mind in your home.
Recognizing the Function of a Security Gateway
Common Threats in your home (Stairways, Kitchens, Balconies)
One of the most typical areas where safety and security gateways are needed includes:
Stairs: To stop drops
Kitchens: To keep children or kids far from hot surfaces, sharp items, and other risks
Balconies or large windows: To prevent accidental drops
How a Safety Gate Protects Babies, Toddlers, and Pet Dogs
Security gateways are designed to serve as a barrier between kids and harmful content. They help prevent curious children from exploring areas they should not, keeping them safe from potential mishaps. They likewise work well for keeping pets out of certain areas, providing better control over their movements.
Why Structure Your Own Can Be Much Better than Acquiring One
Cost Financial Savings: DIY entrances are commonly more affordable than store-bought options.
Custom-Suitable For Awkward Spaces: You can tailor eviction to your specific measurements, especially for one-of-a-kind or hard-to-fit areas.
Planning Your DIY Safety Gate Task
Action Twice, Develop When: Examining Your Area
Measuring Size and Height Correctly: Begin by gauging the opening where you intend to install the gate. Measure both the size and the height meticulously to make sure a snug fit.
Inspecting Wall Stamina and Surfaces: Make certain that the surfaces where the gate will be installed are strong enough to support it. Utilize a stud finder to check for wall studs if you’re installing a wall-mounted gate.
Picking the Right Kind of Security Entrance
Pressure-Mounted vs Wall-Mounted: Pressure-mounted gates are much easier to set up and remove, but might not be as safe and secure. Wall-mounted gates, while more irreversible, offer a stronger hold and are often more secure in high-traffic areas.
Swing-Open vs Sliding Styles: Swing-open gateways offer easier access, while sliding gateways are best for narrower rooms.
Establishing Goals: Safety And Security First, Style Secondly.
Minimum Height Recommendations: The gate needs to be at least 30 inches high to prevent climbing.
Space Dimensions to prevent Trapped Heads or Limbs: Make sure the spacing between the slats is no more than 2.5 inches to prevent limbs from getting stuck.
Materials and Tools You Will Certainly Require
Recommended Products for Strength, Safety, and Security.
Wood Options (Softwood vs Wood) or Steel Alternatives: Select materials like want (softwood) for very easy cutting or oak (hardwood) for added strength. Metal entrances offer durability but may require specialized devices.
Screws, Hinges, Latches, and Brackets: Select solid, durable screws and braces. Hinges should be sturdy enough to support the gate’s weight.
Non-Toxic Paint or Varnish Options: Use safe, non-toxic coatings, especially in areas where children will be.
Essential Tools (That Several Households Currently Own)
Tape Measure, Saw, Drill, Screwdriver, Sandpaper, etc.: These standard devices are commonly available at home. If you do not have them, you can buy budget-friendly alternatives.
Budget Failure: Do It Yourself vs Store-Bought Gates
Structuring your gate can save you substantial cash. A do-it-yourself gate could cost around $30-$50, depending on the materials, while store-bought options can range from $50 to over $200.
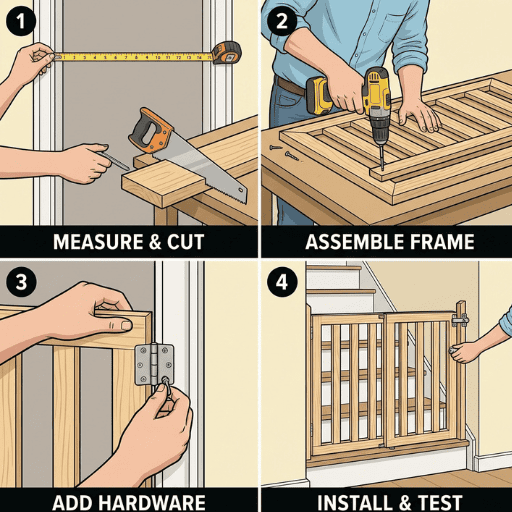
Step-by-Step Directions: Just How to Make a Safety Entrance in the House
Step 1– Design Your Gate on Paper
Easy Front View Layout with Basic Dimensions: Draw a draft of your entrance. This will certainly aid you visualize the layout and guarantee you have the right measurements.
Slat Spacing for Safety Compliance: Mark the spacing for upright slats (remember, no more than 2.5 inches apart).
Step 2– Cut the Framework Pieces Securely
Cutting Top Rail, Bottom Rail, and Side Posts: Using a saw, thoroughly cut your structure pieces to the wanted size. Make sure all cuts are straight.
Action 3– Add the Upright Slats/Spindles
Determining Even Distances In Between Slats: Equalize the areas of the slats along the framework. Utilize a spacer block to ensure consistent spaces.
Securing Slats with Screws or Dowels for Bonus Toughness: Attach the slats securely utilizing screws or dowels. Double-check that they are securely in position.
Action 4– Smooth All Sides and Surface areas
Sanding Tips to Avoid Splinters: Sand down rough sides and edges to ensure they are smooth and child-friendly.
Rounded Corners vs Sharp Edges: Consider rounding the edges of your gateway to prevent sharp edges that could cause injury.
Step 5– Attach Hinges Securely
Placement Joints in Reinforced Locations: Affix the joints to the top of the gate, ensuring that they are installed on solid timber or steel.
We walked through the step-by-step process for making a safe, strong infant entrance, customized to your home and your child’s requirements.
Currently, it’s your turn to put that expertise into action. Don’t wait for a near-miss or a scare to remind you exactly how crucial security is —begin gathering your products, determine your entrance or staircase, and start developing your custom-made infant entrance today. Every minute you invest in this project is a minute of added defense for your kid.
If you’re ready to secure your area, take the first step today: Review the supply list, determine your dimensions, and schedule a time to develop your entrance. Your future self—and your baby—will thank you for creating a much safer home.


